You open the drawer to grab a spatula. You end up moving a tangled mess of twist ties, a mystery battery, three takeout menus from 2022, and what might be a garlic press — or a lemon squeezer, honestly you’re not sure — before finally finding it buried at the back. You close the drawer. You sigh. You promise yourself you’ll sort it out this weekend.
Sound familiar?
Here’s the thing: the problem isn’t that you’re disorganized. The problem is that most kitchen drawers are set up to fail from the start — no zones, no boundaries, no system. Everything just… lands where it lands. And over time, even the most put-together person ends up with a junk drawer situation in every single drawer.
This guide is going to change that. We’re going to walk through how to organize kitchen drawers step by step — from the full clear-out to the final label — in a way that’s easy to do on a Saturday morning and, more importantly, easy to maintain on a random Tuesday night when you’re tired and just want to make dinner.
No expensive renovations. No fancy custom cabinetry. Just a system that actually works.
Key Takeaways
- The average kitchen has 3–6 drawers — and most people only organize 1 (the utensil drawer). The rest become chaos zones.
- The #1 reason drawer organization fails isn’t laziness — it’s the wrong organizer size. Measuring first saves you from buying 3 sets of organizers that don’t fit.
- A dedicated “zone” for each drawer takes about 20 minutes to set up and can realistically last 6–12 months before needing a reset.
- You don’t need to buy anything to start — the first step is always a full empty-out and purge.
- Small kitchens and rentals can absolutely have organized drawers. No drilling required.
Step 1: Empty Every Drawer at Once (Yes, All of Them)
This is the part most organization guides skip, and it’s exactly why so many people end up reorganizing the same drawer three times.
If you only organize one drawer at a time, you’ll constantly be moving things between drawers without ever solving the real problem: too much stuff with no designated home.
Pull everything out. Put it on the counter or the kitchen table. Yes, it’s going to look like chaos for about 20 minutes — that’s fine. That’s the process.
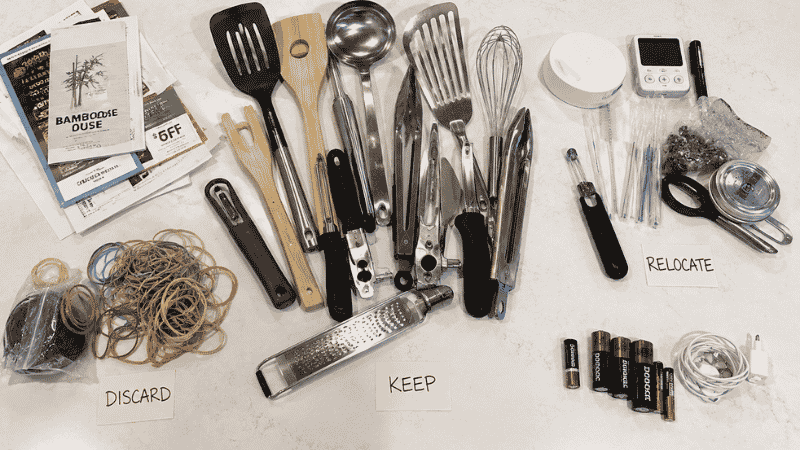
While everything is out, do a quick sort into three piles:
- Keep — you’ve used this in the last 3 months
- Relocate — it belongs somewhere, just not in a kitchen drawer (junk mail goes in recycling, tools go in the garage, you get the idea)
- Let go — duplicates, broken things, items that made you say “oh, I forgot this existed”
A study from UCLA’s Center on Everyday Lives and Families found that the density of household objects in a home directly correlates with elevated cortisol levels — meaning clutter isn’t just visually annoying, it’s genuinely stressful. Getting things out of the drawers and making actual decisions about them is the stress-relief part, not just the aesthetic part.
One honest note: this step takes longer than you think. Budget 30–45 minutes for the empty-and-sort phase alone if you have 4+ drawers. Put on a podcast. Make yourself a coffee. It’s worth it.
Step 2: Measure Your Drawers Before You Buy Anything
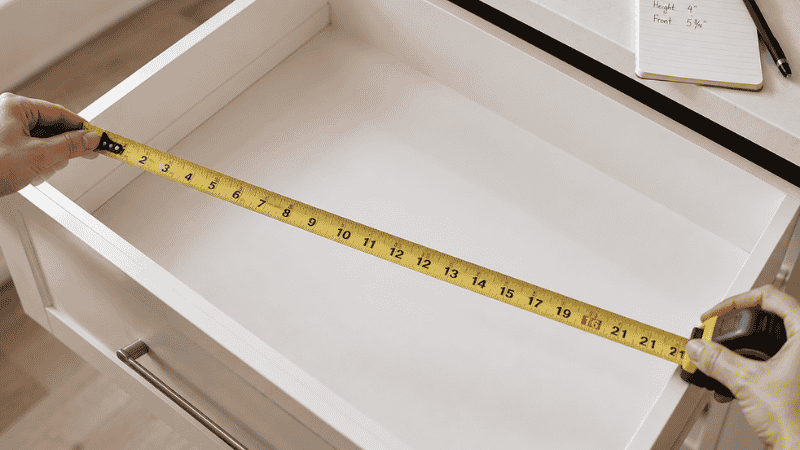
This is the step that saves you from the most common (and most expensive) organizing mistake: buying organizers that don’t fit.
Grab a tape measure and write down the interior dimensions of each drawer — width, depth, and height. Don’t guess. Don’t eyeball it.
Most kitchen drawer organizers are designed for standard sizes, but “standard” varies wildly between kitchens. A set that works perfectly for a wide American kitchen might not fit a narrower European-style cabinet at all.
What to measure:
- Width (side to side)
- Depth (front to back)
- Interior height (especially if you have drawers with under-cabinet storage above them — some have less clearance than you’d expect)
Write these numbers on your phone or a sticky note before you go shopping or add anything to your cart. It sounds obvious, but it’s the single thing that prevents 90% of “I bought the wrong thing” returns.
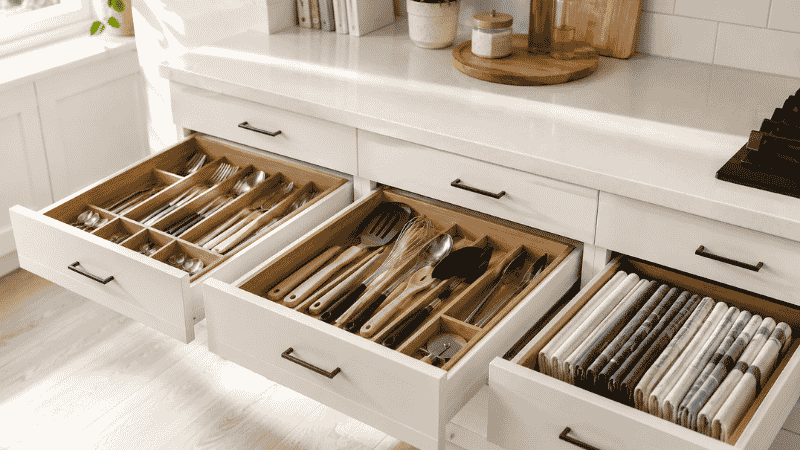
Step 3: Assign Each Drawer a Job (The Zone System)
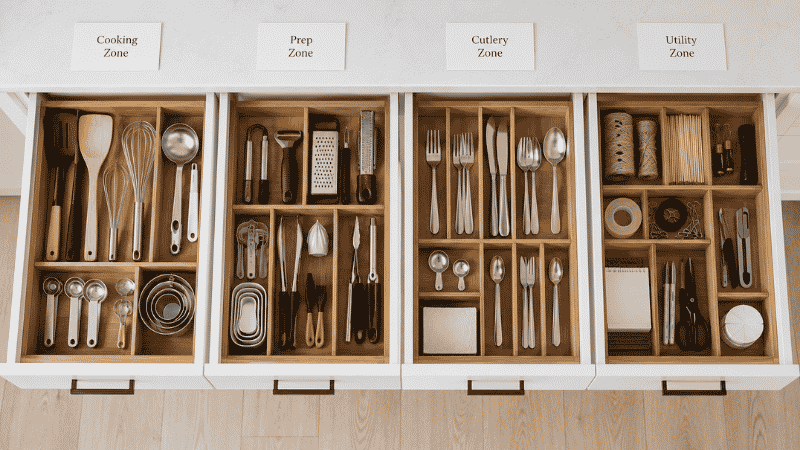
Here’s the organizing principle that makes the biggest difference and gets the least attention: every drawer needs a single, clear purpose.
Not “miscellaneous.” Not “overflow.” A real job.
Think about how you actually move through your kitchen. Where do you stand when you’re cooking? Where do you plate food? Where do you prep? Your drawer zones should map to those physical spots.
A simple zone system for most kitchens:
The Cooking Zone (drawer closest to the stove) Spatulas, tongs, wooden spoons, ladles. The things you reach for with one hand while the other is stirring. This drawer should have maybe 6–8 items max — the tools you use almost every day.
The Prep Zone (drawer nearest the cutting board or counter space) Peelers, graters, can openers, kitchen scissors. These come out during food prep, not during cooking. Keeping them separate from the cooking tools means less reaching over things mid-recipe.
The Cutlery Zone (usually near the dishwasher for easy unloading) Forks, knives, spoons. Most people have this one covered already — but if your cutlery drawer has somehow also collected rubber bands, a birthday candle, and a mystery key, it’s time for a reset.
The Utility Zone (often the deepest drawer) Dish towels, oven mitts, trivets. Bulky items that need more depth than width.
The “Controlled Junk” Zone (optional, but realistic) Look — most households have a drawer that collects small necessities that don’t fit neatly elsewhere: takeout menus you actually use, a notepad, spare batteries, a few rubber bands. The goal isn’t to eliminate this drawer. It’s to contain it with actual organizer bins so it stays manageable.
If you have more than 5 drawers, the extras can become category-specific: baking tools, specialty gadgets, wraps and bags. The key is naming the category before you put a single thing back in.
Step 4: Choose the Right Organizers for Each Drawer
Once you know each drawer’s job and its measurements, choosing organizers becomes genuinely simple. You’re not picking the prettiest set — you’re picking what fits and what works for that drawer’s specific contents.
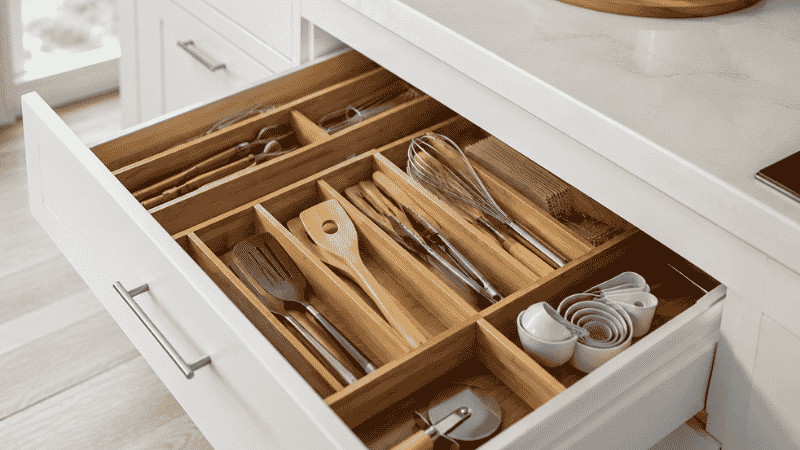
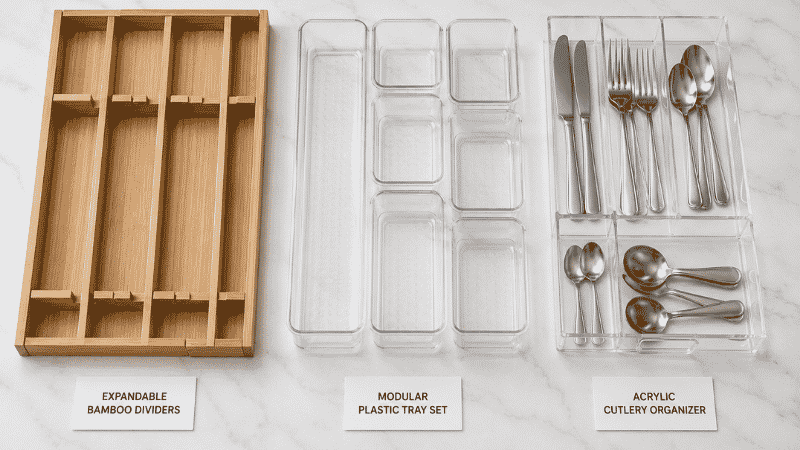
For the utensil and cooking drawer: Expandable bamboo or adjustable plastic dividers work better here than fixed compartment sets. Utensils are bulky and oddly shaped — you need flexibility in compartment size. Look for sets that expand from about 10 inches to 17+ inches so you can customize to your exact width.
What to avoid: Pre-configured utensil holders with specific slots for specific tools. If your spatula is wider than the “spatula slot,” the whole system falls apart immediately.
For the cutlery drawer: This is where a proper modular tray system shines. Separate compartments for forks, knives, spoons, and teaspoons. Clear acrylic or neutral bamboo both work well — the material matters less than the fit.
Editor’s note: If you’ve been living with an expandable silverware tray from a discount store that slides around every time you open the drawer — a tray with non-slip base is one of those $12 upgrades that genuinely improves your daily life in a small but real way.
For the prep tools drawer: Modular small-bin organizers (the kind you can rearrange) are ideal here because prep tools come in wildly different sizes. A garlic press and a zester and a can opener need completely different compartment shapes. Being able to reconfigure the bins as your tools change is worth more than a beautiful fixed set.
For the utility drawer (towels, oven mitts): You don’t need organizers here — you need a folding system. File-folding dish towels so they stand vertically (like files in a filing cabinet) means you can see all of them at once and pull one out without disturbing the rest. This one change will make a drawer that’s always messy suddenly look like it belongs in a catalog.
For the controlled junk drawer: Individual small bins are your best friend. One for batteries. One for rubber bands/clips. One for takeout menus. One for pens. Label them. The goal isn’t to make it pretty — it’s to make sure nothing is just floating loose.
Step 5: Put Everything Back with Intention
Now the satisfying part.
Put each item back in its assigned drawer, in its assigned zone. A few things to keep in mind as you go:
Frequency first. The things you use most often should be easiest to reach — at the front of the drawer, in the compartment closest to you. The lemon zester you use twice a year can live at the back.
Don’t overfill. This is the most important rule for maintaining organization long-term. Each compartment should have a little breathing room. When a compartment is stuffed to the brim, things topple over, the organizer shifts, and within two weeks it looks exactly like it did before. Leave 20% of each compartment empty. If something doesn’t fit, ask whether it should be in this drawer at all.
Duplicates are the enemy. If you found three can openers during your empty-out, you need one. Maybe two if one is your “backup.” Three is how drawers become permanent landfills.
How to Organize Kitchen Drawers When You Only Have 10 Minutes
Sometimes you don’t have a whole Saturday. That’s fine. Here’s what you can actually accomplish in a short burst without undoing everything when you run out of time:
10 minutes: Pull out just one drawer. Empty it on the counter, throw out the obvious junk, and put things back in rough categories. No organizers needed yet — just grouping. A drawer with four loosely grouped zones beats a drawer with zero zones.
20 minutes: Do the full empty-and-sort on your most chaotic drawer. Don’t buy anything yet — just measure and sort so that when you do shop, you know exactly what you need.
30 minutes: Complete one full drawer — empty, sort, measure, and rearrange with whatever organizers you already own. Most people have at least one set of organizers floating around somewhere that just isn’t being used correctly.
The point isn’t perfection on day one. The point is momentum.
Why Your Kitchen Drawers Keep Getting Messy Again (And How to Fix It)
This is the conversation most organization articles avoid, but it’s the most important one.
If you’ve organized your kitchen drawers before and they were back to chaos within a month, it probably wasn’t because you didn’t try hard enough. It was likely one of these three things:
The system was too complicated to maintain. If putting something away requires more than 2 seconds of decision-making, it won’t happen consistently. A system that works is one where everything has one obvious place, and returning things to that place is the path of least resistance.
The organizers didn’t actually fit. An organizer that slides around the drawer, or leaves gaps where things fall through, or doesn’t have the right compartment shapes for what you own — that’s a system that’s already defeated before you start.
You kept too much. Organization can’t fix too much stuff. If your utensil drawer has 25 items in it, even the best organizer won’t make it feel manageable. The purge isn’t optional — it’s the foundation.
The maintenance fix: Once a month (it takes 5 minutes), do a quick drawer scan. Return anything that’s migrated to the wrong drawer. Toss anything that’s appeared and doesn’t belong. That’s it. Five minutes once a month prevents the 3-hour reorganization session every six months.
Organizing Kitchen Drawers in Small Kitchens and Rental Apartments
Small kitchens have fewer drawers, which means each one is doing triple duty. And rental kitchens usually have shallower drawers with less interior height, which limits the organizer options.
Here’s what works specifically for small-space situations:
Prioritize vertical space. In a shallow drawer, stackable small bins (ones that can sit on top of each other when the drawer is deep enough) let you create a second “layer” of storage. This doesn’t work in every drawer, but where the height allows, it doubles your capacity.
Drawer dividers over fixed trays. Expandable bamboo dividers that slide into place without screws or adhesive are ideal for rental kitchens. They hold their position, they’re adjustable as your needs change, and they leave zero damage when you move out.
Accept that some items belong elsewhere. In a small kitchen, the instinct is to cram more into every drawer. The better move is to decide what genuinely must live in a drawer and relocate everything else — to a wall-mounted magnetic strip for knives, a countertop utensil holder for daily-use tools, or a cabinet with a lazy Susan for the awkward corner storage.
No-drill magnetic knife strips are a small-kitchen game changer. Moving knives out of the knife drawer immediately frees up significant space and — honestly — is also safer than rummaging past knife blades every morning.
FAQ: How to Organize Kitchen Drawers
How do I organize kitchen drawers without buying anything? Start with the empty-and-sort step. Group similar items together using whatever containers you already have — small bowls, food storage containers, boxes. The zone system works even without dedicated organizers. Buying the right organizers becomes much easier once you’ve done the initial sort and know exactly what you’re working with.
What is the best way to organize a junk drawer in the kitchen? Give it structure, don’t eliminate it. Use small individual bins (even repurposed food containers work) to create defined zones within the drawer: one area for batteries, one for pens/notepads, one for rubber bands and clips, one for small tools. The key is that nothing floats loose — every item belongs to a specific bin, even in the “junk” drawer.
How do I stop my kitchen drawers from getting messy again? The three-part answer: don’t overfill (leave 20% of space empty), make sure the system is simple enough that putting things away takes zero thought, and do a 5-minute reset once a month before things spiral.
Should kitchen drawers be organized with bamboo or plastic organizers? Both work well — it comes down to your kitchen aesthetic and your drawers’ specific dimensions. Bamboo is slightly more rigid and looks more polished; plastic modular systems are more flexible and easier to reconfigure. If your kitchen drawers are non-standard sizes, plastic modular systems are usually easier to adapt.
How do I organize deep kitchen drawers? Deep drawers work best with a two-tier approach. Place taller items (large serving spoons, whisks) vertically in the back half, and shorter, frequently-used items in the front. Drawer inserts with varying compartment depths help prevent the “everything sinks to the bottom” problem. Some people use a peg system (removable pegs that create custom dividers) in deep drawers for maximum flexibility.
How many items should go in a kitchen utensil drawer? As a general rule, aim for no more than 8–10 items in your primary cooking utensil drawer. If you regularly use more tools than that, consider a secondary prep drawer. More than 10–12 items in one drawer means you’re either overstocked or need a better zone system.
What’s the best first step if my kitchen is completely chaotic? Start with the drawer you open most. Just that one. Empty it, throw out the obvious junk, measure it, and put things back in rough zones. One organized drawer gives you momentum and a reference point for everything else.
Your Next Step
If you’ve made it this far, here’s what I’d suggest doing right now — not eventually, now: go open your most-used kitchen drawer. Count the items in it. If it’s more than 10, you already know what the first 30 minutes of your weekend is going to look like.
Organized kitchen drawers aren’t about having a picture-perfect home. They’re about removing one small, daily friction from your life — the kind of friction that adds up over months until you’re genuinely stressed just walking into your own kitchen.
Start with one drawer. See how it feels. Then do the next one.
Explore more on Vomoxs:
- How to Organize Kitchen Cabinets: A Room-by-Room Guide
- Small Kitchen Organization: 8 Practical Ideas That Don’t Require Renovation
- How to Declutter Your Home Without Getting Overwhelmed
References
- Saxbe, D. E., & Repetti, R. (2010). No Place Like Home: Home Tours Correlate With Daily Patterns of Mood and Cortisol. Personality and Social Psychology Bulletin, 36(1), 71–81. UCLA Center on Everyday Lives and Families research on household clutter and cortisol levels.
- Roster, C. A., Ferrari, J. R., & Jurkat, M. P. (2016). The dark side of home: Assessing possession ‘clutter’ on subjective wellbeing. Journal of Environmental Psychology, 46, 32–41.
Category: Room Organization | Reading time: 9 min | Last updated: 2026