
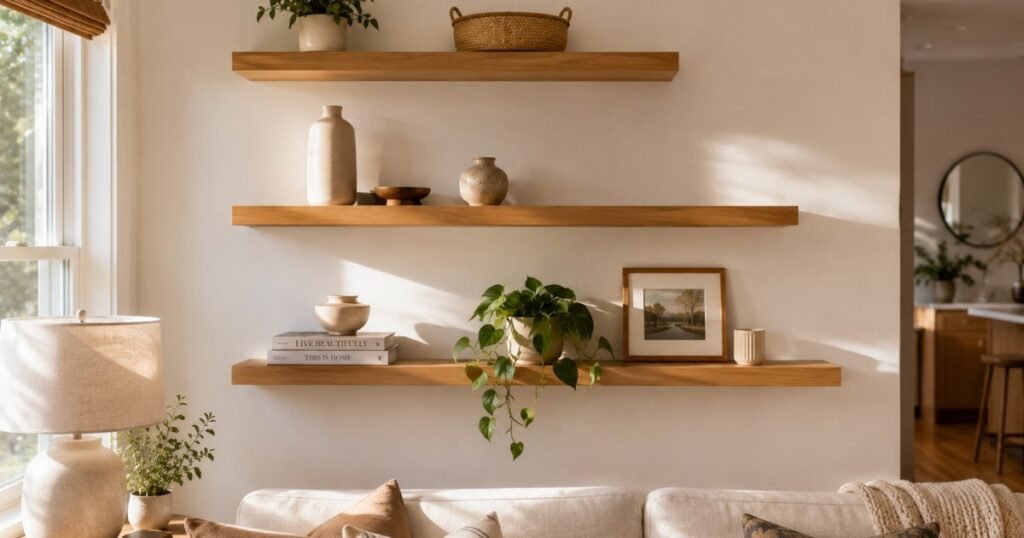
The best floating shelves don’t just make a room look better—they make everyday life a little easier.
But that’s not always what happens. A shelf that starts with a neatly arranged plant, a few books, and a candle can quickly become home to coffee mugs, charging cables, unopened mail, and everything else without a place to go.
The problem isn’t open shelving—it’s relying on decoration without a practical storage plan.
In this guide, you’ll discover floating shelf ideas for every room, along with simple styling formulas, smart storage solutions, installation tips, and maintenance habits that help your shelves stay beautiful, functional, and easy to keep organized over time.
Modern Floating Shelf Ideas for Every Room
Living Room
The living room shelf is the one most people overthink. They want it to look like a Pinterest board and end up with either a collection of objects that have no relationship to each other, or a shelf so sparse it looks like they haven’t moved in yet.
The items that tend to work best in living room floating shelves: books (stacked horizontally or vertically, used as anchors), plants (trailing varieties like pothos or heartleaf philodendron add movement without requiring much maintenance), art (leaned rather than hung — more flexible, easier to rotate), and one or two decorative objects with real visual weight.
The thing about avoiding that overcrowded look: it’s almost always a density problem, not a taste problem. Too many objects at similar heights with similar visual weight creates static noise. The eye doesn’t know where to rest. The fix isn’t removing everything — it’s varying the scale, leaving deliberate gaps, and making sure not everything is competing for attention at once.
Kitchen
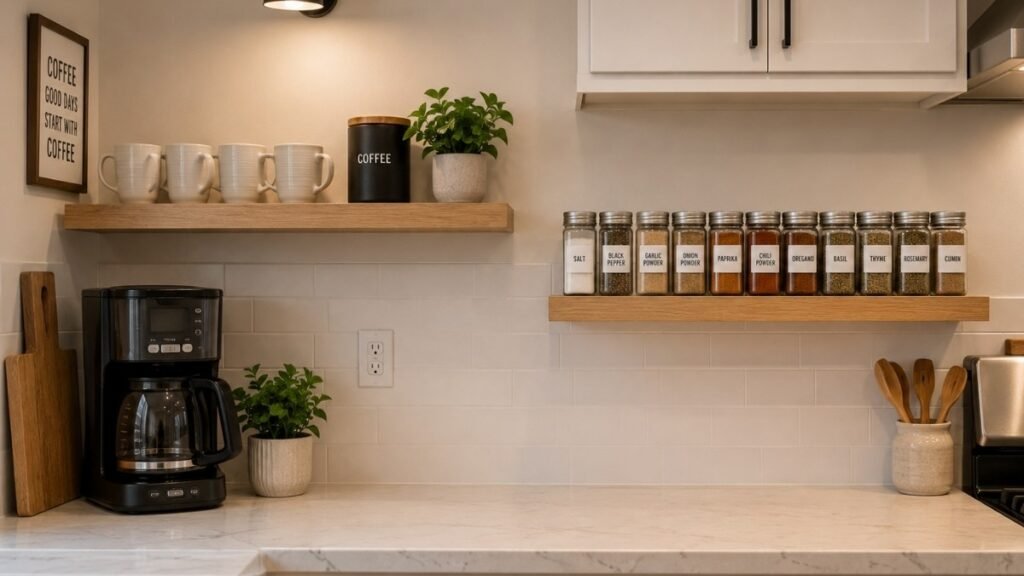
The kitchen floating shelf has to do two jobs simultaneously: look good and function as actual storage. Unlike living room shelves, kitchen shelves need to earn their place every single day.
The most functional kitchen shelf setups I’ve seen organize around one primary use:
Coffee station: A shelf between 14 and 20 inches above the counter, dedicated entirely to the coffee ritual. Mugs in front, coffee beans in a canister beside them, a small plant or basket on the end. Keeps the counter below clear. Looks intentional because it is.
Everyday dishes: Open shelving replacing upper cabinets — works beautifully when the dishes are consistent (matching sets, or a curated mix of whites and neutrals) and falls apart when every dish is different. The visual coherence of the items carries more weight than the shelf itself.
Spice storage: A single floating shelf slightly above counter height, just deep enough for one row of jars. Eliminates the cabinet dive every time you’re cooking. Works best with uniform jars and labels facing forward.
Open pantry extension: In small kitchens especially, a floating shelf beside the refrigerator or on an adjacent wall adds pantry capacity that no cabinet could fit. Baskets contain the visual noise.
One thing I learned from Reddit users who’ve done this: a lot of first-time kitchen shelfers buy cheap hidden brackets, install them, load the shelf with a coffee maker and mugs — and within a few days, the shelf starts tilting. That’s a bracket weight problem combined with a stud-finding problem. More on that in the installation section.
Bathroom
The bathroom is actually one of the best places for floating shelves, because the storage needs are specific and limited, and the aesthetics payoff is immediate.
Above the toilet is the most obvious placement — usually 12 to 18 inches of unused wall space that can hold towels, baskets, and backup toiletries without touching the floor footprint.
The thing most bathroom shelf guides miss: hide the ugly bottles. Every bathroom has them — the large shampoo bottle, the not-photogenic soap refill, the medication bottles. The shelves that look good in bathrooms are the ones where those things live in matching baskets or containers, and the visible items are either deliberately decorative (a candle, a plant, a rolled towel) or functional items that happen to look good (matching apothecary jars for cotton balls and Q-tips, a small soap dish, a diffuser).
A bathroom shelf that holds toiletries and hides nothing will look cluttered within a week regardless of how nicely it was arranged on day one.
Bedroom
The floating shelf-as-nightstand is one of the most practical bedroom ideas I keep coming back to in small rooms. A wall-mounted shelf at mattress height on either side of the bed does everything a nightstand does — phone charging spot, lamp perch, book and glass of water — without occupying any floor space. In a small bedroom, that floor clearance genuinely changes how the room feels.
For bedrooms with more space, floating shelves above the dresser or desk create a display and storage zone that doesn’t require an additional piece of furniture. Keep the styling simple here — the bedroom benefits more from visual calm than any other room.
Entryway
The entryway shelf does its best work when it’s functional first. A shelf at eye level near the door for keys, mail, and small baskets is more valuable than a decorative display in this location — because the entryway is where the organizational habits are made or broken every single day.
Small baskets for mail, a tray for keys, hooks below the shelf for bags — this combination handles 90% of entryway clutter and keeps the floor clear. The shelf doesn’t need to look like a magazine spread. It needs to make the morning routine easier.
Laundry Room
The laundry room floating shelf is pure function, and there’s no reason to apologize for it. Vertical wall storage in a laundry room — a shelf above the machines for detergent and supplies, another above it for backup stock and seasonal items — frees the machines themselves of the accumulated products that typically live on them.
The one styling note: decanting detergent into matching dispensers and putting backup supplies in labeled baskets keeps a laundry room shelf from looking like a product stockpile. It takes ten minutes and costs almost nothing.
How to Style Floating Shelves Like a Designer (Without Guessing)
Here’s the honest version: there are a few formulas that work consistently, and once you understand them, you stop second-guessing every arrangement.
The 3-Layer Shelf Formula
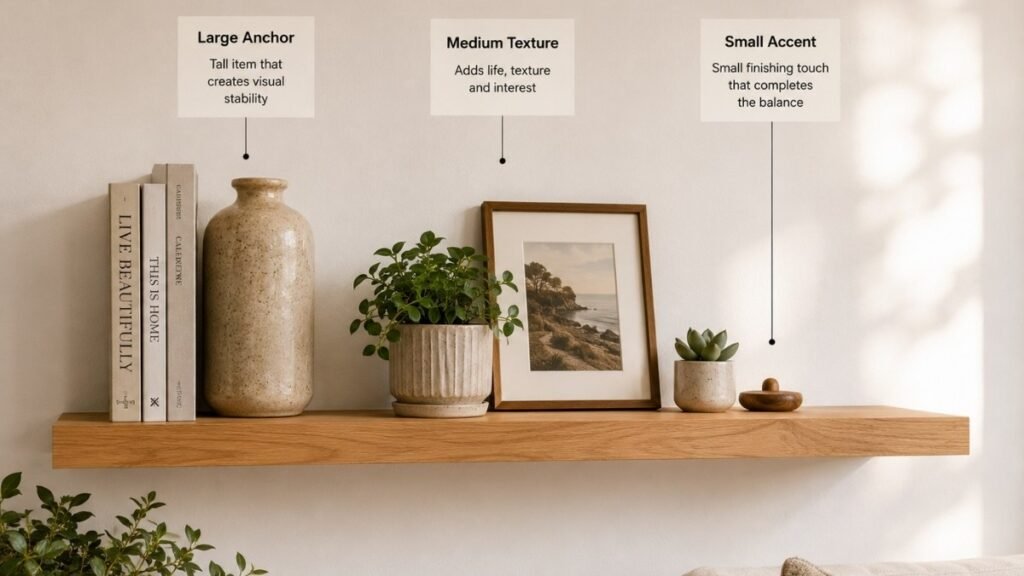
Every well-styled shelf has three levels of visual weight:
Large Anchor — one item that establishes the scale of the shelf. A stack of books, a tall vase, a significant plant. This item grounds everything else.
Medium Texture — two or three items that add visual variety without competing with the anchor. A smaller plant, a framed photo leaned against the wall, a canister or jar.
Small Accent — one or two tiny details that add the finishing touch. A small figurine, a single succulent in a small pot, a candle. These disappear into the arrangement at normal viewing distance but add life up close.
Most shelves that look off are missing one of these layers, or have too many items in one layer competing with each other.
The Rule of Three
Odd numbers work better than even numbers in shelf arrangements — visually, they’re harder to make look perfectly symmetrical, which creates the slightly relaxed, organic quality that makes shelves look curated rather than staged. Three main objects per shelf section. Five if the shelf is longer.
Leave 30% Empty Space
This is the one I have to remind myself of constantly. The temptation when shelves are new is to fill them — you have the space, you have the objects, why not use it all?
Because empty space is what gives the eye somewhere to rest. A shelf at 70% capacity looks considered and intentional. A shelf at 100% looks crowded, even if every individual item is beautiful. Leave gaps deliberately, and resist the urge to fill them.
Mix Heights and Materials
A row of objects all the same height creates a flat, static visual line. Varying the heights — a tall stack of books next to a medium vase next to a low candle — creates movement and interest. Similarly, mixing materials (wood, ceramic, glass, metal, natural fiber) adds texture that makes a shelf look collected over time rather than purchased all at once.
Books as Decorative Risers
Books have a structural role on shelves that goes beyond their content. A horizontal stack of four or five books creates an instant platform — place a small object on top and you’ve created height variation with something you already own. Stacked horizontally with spines hidden (faces up or turned to the wall) creates a neutral, textural element that works in almost any style context.
Picture Ledges Made Easy
A shallow picture ledge — shallower than a standard floating shelf, usually 3 to 4 inches deep — creates a dedicated zone for leaned art, framed photos, and small prints. Layering frames at different sizes and depths creates a gallery feel without requiring any wall holes for hanging. Easier to rearrange, easier to update seasonally.
Small Space Hacks That Make Floating Shelves Work Harder
This is the section most floating shelf guides skip entirely. In a small space, shelves aren’t decor — they’re the primary storage strategy.
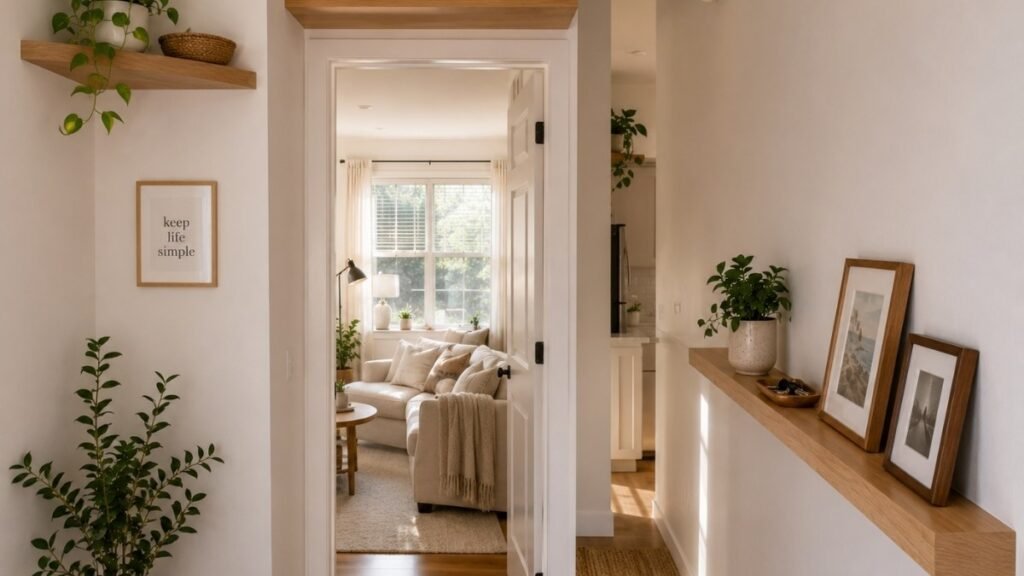
Corners
Corner shelves use space that’s almost always wasted. A triangular floating shelf in a bathroom corner, a set of corner shelves ascending up a stairwell, a corner kitchen shelf for spices — these use the geometry of the room rather than fighting it. The visual effect in small rooms is also significant: shelves that wrap corners make a space feel larger by drawing the eye around rather than stopping it at a flat wall.
Above Door Storage
The wall space above interior door frames is rarely used and surprisingly large — usually 12 to 18 inches of height across a 32-36 inch wide doorway. A single floating shelf above the door holds items accessed infrequently (seasonal decor, extra linens, books not in current rotation) in space that’s genuinely otherwise wasted. Not ideal for daily-use items, but excellent for everything that needs a home but doesn’t need to be easy to reach.
Narrow Hallways
A shallow floating shelf (4 to 6 inches deep) running the length of a narrow hallway adds significant storage without reducing the walking width at all. Keys, mail, small plants, art — a hallway shelf turns what’s usually dead wall space into functional storage without making the hall feel any smaller.
Tiny Apartment Kitchens
In a studio or one-bedroom apartment where counter and cabinet space is at a premium, floating shelves often do more work than any other storage solution. A shelf between the counter and the upper cabinet (where there’s usually 18 inches of unused wall space) holds frequently used items at arm’s reach. A shelf beside the refrigerator holds pantry overflow. Shelves above the window hold items that don’t need to be accessed daily.
The key in tiny kitchens: keep everything on the shelves in use. A kitchen shelf that holds decorative items in a small kitchen is a kitchen shelf that’s wasting storage capacity.
Over the Toilet
Already covered in the bathroom section, but worth emphasizing in the small-space context: the wall above the toilet is almost always the best available storage real estate in a bathroom. Two or three floating shelves staggered in height hold towels, toiletries, plants, and baskets without touching the floor footprint at all.
Under Cabinets
A floating shelf mounted on the wall directly under upper kitchen cabinets — between the underside of the cabinet and the countertop — uses the 18-inch space that typically holds only the counter itself. A narrow shelf here holds spices, oils, or small items at exactly the right height for cooking. The shelf essentially turns one usable surface (the counter) into two.
The Hidden Storage Secret: Make Open Shelves Look Clean
This is the section that changes how floating shelves actually function long-term. The first time anyone organizes a floating shelf, the instinct is to put everything attractive on display. The reality of living with it reveals the problem within about three weeks.
The 20/80 Rule
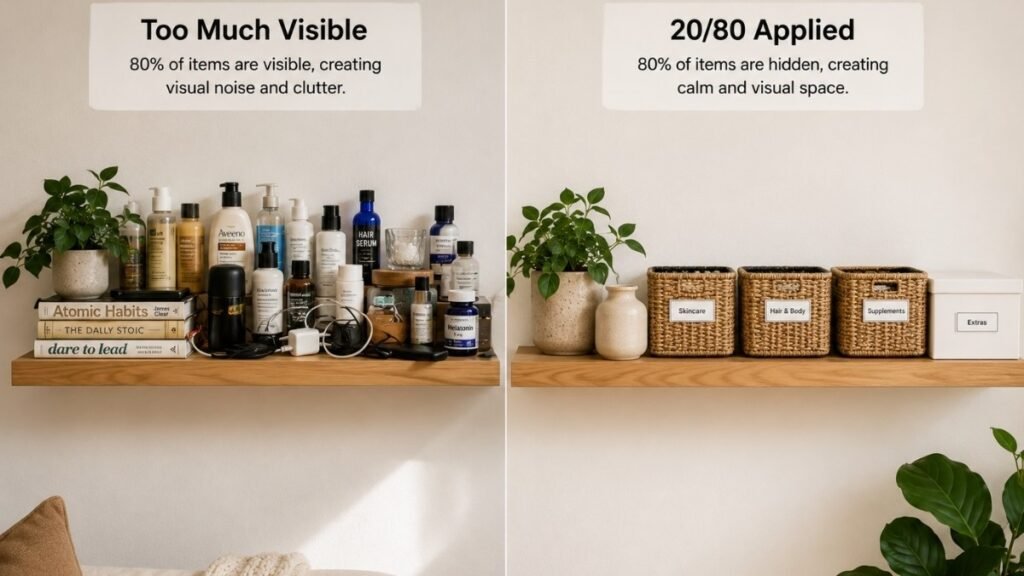
Really good-looking floating shelves display about 20% of what they store, and hide 80%.
That sounds counterintuitive — why have open shelving if most of the storage is hidden? Because the 20% that’s visible is curated and intentional, and the 80% that’s hidden is contained in matching boxes and baskets that look like part of the design even though they’re concealing the actual mess.
The shelves that look like clutter almost always have the ratio inverted — too much visible, not enough contained.
Use Matching Storage Boxes
The fastest way to clean up a floating shelf visually is to put everything that doesn’t look good into matching boxes. This doesn’t mean expensive boxes — three identical white cardboard boxes or three matching wicker baskets from the same source cost very little and transform a shelf from a collection of random objects to a composed arrangement.
The boxes themselves become design elements. The shelf looks organized not because everything on it is beautiful, but because the non-beautiful things are inside identical containers.
Woven Baskets
Woven baskets — particularly rattan or seagrass — do the hiding work of storage boxes while adding texture that reads as intentionally decorative. A basket on a shelf can hold toiletries in a bathroom, snacks in a kitchen, charging cables in a living room, or toys in a kids’ space — and in each case it looks like a design choice rather than a storage solution.
Cable Management
Living room and office floating shelves often end up housing electronics — speakers, routers, game controllers, charging stations. The cables are what make these arrangements look chaotic rather than the items themselves. Cable clips to route cords along the back or underside of the shelf, a cable management box to hide the power strip, and wireless alternatives where possible (a wireless charging pad rather than a cable coiled on the shelf) dramatically change how these shelves read visually.
Medicine Storage
The bathroom medicine cabinet is the right home for prescription medications and daily health items — not a floating shelf in a main bathroom. But for the overflow that doesn’t fit in the cabinet, a small basket on a bathroom shelf can hold backup items that are otherwise stored in an unsightly pile. The basket hides it; the shelf holds the basket.
Kids’ Toys
A floating shelf at child height in a playroom or bedroom becomes the most functional toy storage in the room when the toys on it are in labeled bins rather than loose. The shelf provides the structure; the bins provide the categories; the labels make it maintainable by the child rather than the parent. Matching bins on a floating shelf look far more organized than the same toys scattered on a flat shelf surface.
Pet Supplies
The pet supply shelf — food, treats, grooming items, leash — works the same way as every other utility shelf: the items that look fine go on the shelf; the items that don’t go in matching containers. A dedicated floating shelf near the entry for leash and treats, or in the kitchen for food supplies, consolidates pet items that otherwise end up on the counter or floor without a real home.
Budget-Friendly Floating Shelf Ideas
DIY Solid Wood Shelves
A plank of solid pine or poplar from any hardware store, sanded and stained or painted, mounted with quality brackets costs significantly less than retail floating shelves of comparable quality. The wood itself typically runs $15 to $30 for a standard shelf length. The finish is entirely customizable. This is the most cost-effective route to shelves that look high-end.
Affordable IKEA Upgrades
IKEA’s LACK shelf is the most widely installed floating shelf in the world, and there’s a reason: at $8 to $15, it’s affordable, clean-looking, and available in several finishes. The hardware is included. The installation is straightforward. For renters and first-time shelf installers, LACK shelves installed properly and styled thoughtfully look considerably more expensive than they are.
The BERGSHULT and BOAXEL systems offer more customization for kitchen and closet applications while staying within an accessible budget.
Simple Pine Board Projects
A pine board, a tube of wood conditioner, a can of stain, and L-brackets — total cost under $25 per shelf, and the result looks like something from a design shop. The pine takes stain beautifully when properly conditioned first. This is the route I’d take for a kitchen coffee station or a bedroom reading shelf before spending four times as much on a branded floating shelf.
Hidden Brackets Under $20
The floating shelf aesthetic requires brackets that are invisible or nearly invisible — which usually means either brackets that mount inside a hollow shelf or floating bracket hardware that goes into the wall and into the shelf. Both are available for under $20 at hardware stores or online. The quality of the bracket matters significantly for load-bearing applications; a cheap bracket for a heavy coffee station shelf is where most first-time shelf installers run into trouble.
Rental-Friendly Options
Command shelves (3M adhesive mounting strips) work for genuinely light loads — small plants, a few lightweight items — without any wall damage. The weight limit per strip is real and should not be exceeded. For heavier items in rental situations, the choice is usually getting permission to install standard brackets with patch repair on move-out, or choosing free-standing shelving units that achieve a similar aesthetic without wall mounting.
Reddit-Inspired Mistakes Most DIYers Learn the Hard Way
Why Thick Box Shelves Often Look Bulky
A floating shelf with a thick profile (more than 1.5 inches) can look heavy on the wall — the opposite of the clean floating effect most people are going for. Thinner shelf boards create a lighter visual line. The shelf thickness also affects how the bracket system works: hidden bracket systems require the shelf to have enough interior depth to accept the bracket rod, so very thin shelves may require exposed hardware.
The Hidden Bracket Alignment Problem
Installing hidden floating shelf brackets is more exacting than standard bracket installation because there’s no room for error — the rod goes into the shelf, and if the rod placement is off, the shelf won’t sit level. A drilling guide or doweling jig eliminates most of this error. Measure twice; mark the stud carefully; use a level at every step. The extra ten minutes of preparation prevents a crooked shelf.
Why Cheap Brackets Start Sagging
The bracket failure I hear about most from people who’ve installed shelves is a shelf that looked fine on installation day and started sagging within a few months under normal load. This is almost always a weight distribution problem combined with a bracket quality problem — the bracket simply isn’t rated for what’s on the shelf, or it wasn’t anchored into a stud.
For any shelf that will hold meaningful weight (books, dishes, a coffee maker, plant pots), the bracket needs to go into a stud, not just drywall. Drywall anchors work for very light loads. They will eventually fail under real kitchen or book-shelf weight.
Don’t Drill Blind Holes Without a Guide
For hidden bracket installation: a drill guide or doweling jig keeps the hole straight and at the right depth. Freehand drilling blind holes into a shelf rarely produces a clean result. A drill guide costs $10 to $20 and is one of those tools that seems unnecessary until you’ve made a $40 shelf unusable by drilling at an angle.
Recommended: a simple drill guide block, or a doweling jig for more precise work.
Coffee Bar Weight Mistakes
The coffee station shelf is where the weight problem is most dramatic. A shelf holding a full-size coffee maker (6 to 15 pounds), plus mugs, plus a canister of coffee, plus a grinder — that’s potentially 25 to 40 pounds on a single shelf. That weight needs studs, not drywall anchors, and brackets rated for the actual load. Any setup for a coffee station shelf should go into at least one stud, with a second anchor point if the shelf is longer than 24 inches.
Floating Shelf Installation & Weight Guide
This is what users actually worry about when they get to the point of pulling out a drill.
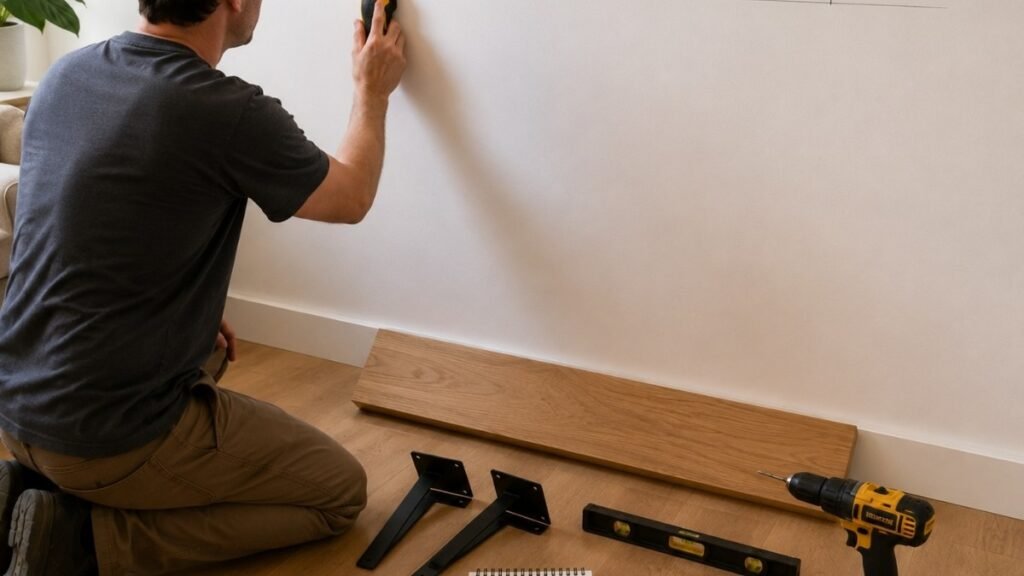
Drywall
Standard drywall without studs will hold approximately 5 to 10 pounds with appropriate toggle bolts or hollow wall anchors — suitable for very light decorative items, small plants, a few lightweight objects. Not suitable for books, dishes, or kitchen appliances. If the installation point doesn’t hit a stud, keep the load light and match the anchor to the stated weight rating.
Stud Walls
When brackets go into studs — the wooden framing behind the drywall — the load capacity increases dramatically. A single bracket properly anchored into a stud will hold 50 pounds or more, depending on the bracket. Two brackets into two studs makes a shelf suitable for books, kitchen equipment, and other heavy loads. A stud finder is a $15 tool that prevents the most common installation mistake.
Concrete Walls
Concrete walls require masonry bits and concrete anchors (sleeve anchors or wedge anchors for heavier loads). The installation takes longer but the result is extremely solid. Concrete provides excellent holding capacity when the right hardware is used.
How Much Weight Can They Hold?
A quick reference:
| Setup | Approximate Capacity |
|---|---|
| Drywall anchors only | 5–10 lbs |
| Single bracket into stud | 40–60 lbs |
| Two brackets into studs | 80–120 lbs |
| Concrete anchors | 100+ lbs |
These are conservative estimates — actual capacity depends on bracket quality, shelf thickness, and load distribution. Always stay within 70% of the stated capacity of your weakest component.
Bracket Spacing
For a shelf up to 24 inches long, two brackets work fine. For 24 to 48 inches, space brackets no more than 24 inches apart to prevent sagging in the middle. For shelves over 48 inches, three brackets or more — middle brackets prevent the center from bowing under load over time.
Shelf Thickness
A shelf board under 0.75 inches thick will deflect (sag in the middle) under moderate load over time. Standard 1-inch (actually 0.75 inch) boards work fine for decorative items. For books and kitchen loads, 1.5-inch or thicker boards resist deflection significantly better.
When You Need Heavy-Duty Hardware
For any installation involving: a coffee maker, cast iron cookware, more than 10 books, large plant pots, or any load over 20 pounds — use brackets explicitly rated for that weight, anchored into studs. The bracket label will state a weight rating; use it.
Keeping Floating Shelves Dust-Free and Easy to Maintain
Almost nobody writes about this, and it’s the thing that determines whether you’ll still like your shelves in two years.
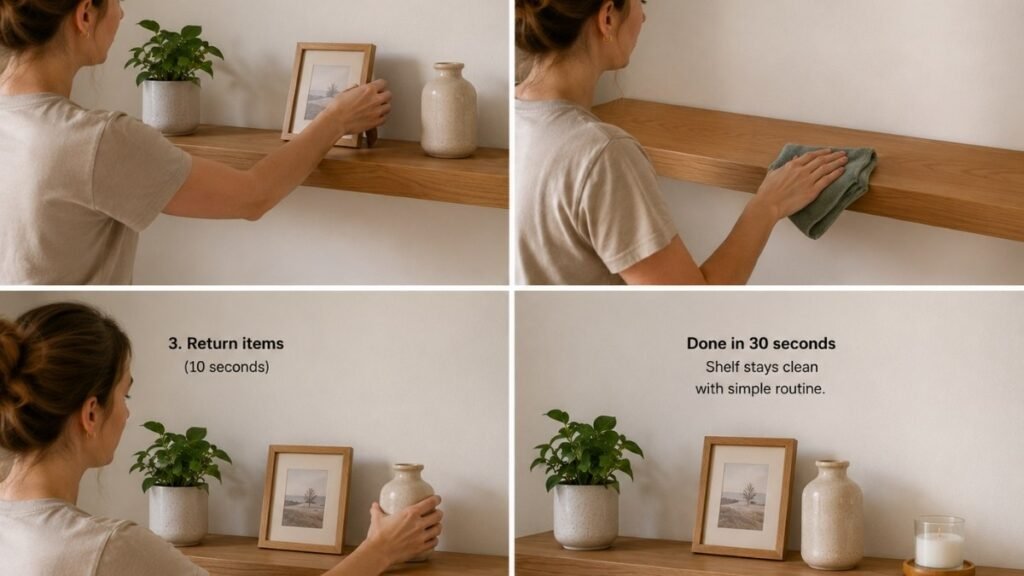
Quick Weekly Cleaning
Open shelves collect dust. This is simply true, and the question is whether the cleaning burden is manageable or not. A shelf with five objects on it takes about 30 seconds to dust: move the objects, wipe the shelf, put them back. A shelf with fifteen objects takes five minutes and often just doesn’t get done.
This is the maintenance argument for keeping shelves at 70% capacity: the cleaning is fast enough to actually happen. A densely packed shelf becomes a shelf that gets wiped around the objects, which means the objects themselves are dusty, which makes the shelf look dingy regardless of how well it was originally styled.
Objects That Collect Less Dust
Smooth surfaces accumulate dust less visibly than textured ones — a glazed ceramic piece needs wiping less often than a rough concrete one. Low-pile textiles (a smooth woven basket) accumulate less than high-pile ones (a fluffy thing). Glass and metal wipe completely clean in one pass. Knowing this doesn’t mean avoiding textured objects, but it does inform where the higher-maintenance items go on a shelf (front and center, where you’ll notice and clean them more regularly).
How Often to Restyle
The shelves that look good year-round are usually restyles two to four times per year — not dramatically, just small adjustments. A different plant. A seasonal element swapped in. An object that’s been in the same spot for six months moved to a new position. These small rotations prevent the shelf from becoming invisible (the visual habit of no longer seeing it) and keep the arrangement feeling fresh without requiring a full redesign.
Child & Pet Safety
Any shelf within reach of small children or large pets should be treated as if it will be grabbed, bumped, or climbed on. Keep heavy or breakable items on upper shelves. Anchor freestanding objects with museum putty on lower shelves. No heavy items on shelves that could fall if a child pulls on them. A properly installed shelf in studs will handle accidental contact; the concern is the objects on it, not the shelf itself.
Prevent Shelf Sagging
Long-term sagging prevention: use thick enough shelf boards (1.5 inch for loads over 15 lbs), space brackets at appropriate intervals (max 24 inches apart), don’t overload beyond 70% of rated capacity, and check bracket tightness once or twice a year. A shelf that starts tilting very slightly is telling you something — catching it early prevents the bigger failure.
Quick Floating Shelf Styling Formula You Can Copy Today
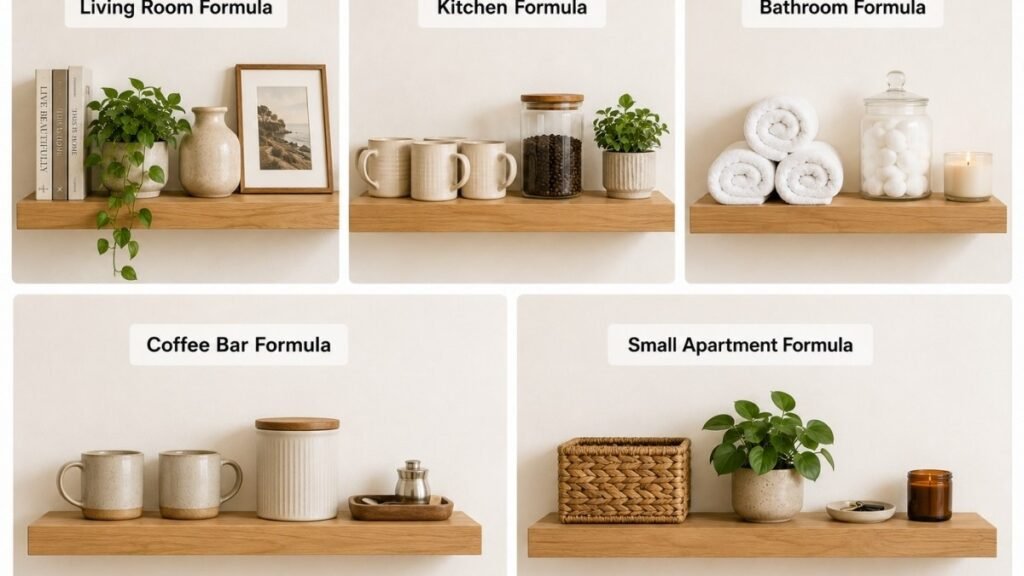
Here are five room-specific formulas you can implement directly:
Living Room Formula: Stack of 4-5 books (horizontal, spines in) + trailing plant in pot + one ceramic object + one framed photo leaned. Leave one-third of shelf empty.
Kitchen Formula: Matching mugs grouped left + coffee canister center + small plant or herbs right + one small basket for packets or sugar.
Bathroom Formula: Rolled white towels (3-4) left + apothecary jar with cotton balls center + small plant or candle right + everything else in a basket.
Coffee Bar Formula: Coffee maker on counter below shelf, not on shelf. Mugs on shelf left + canister center + small tray with spoons right. Shelf at 15 inches above counter.
Small Apartment Formula: Every shelf has one container to hide clutter + one living thing (plant) + one personal item. Maximum five visible objects per shelf section. Everything else in the baskets.
| Room | Layout Formula | Budget | Common Mistake |
|---|---|---|---|
| Living Room | Books + Plant + Frame + Vase | $30–60 | Filling every inch of the shelf |
| Kitchen | Mugs + Coffee Jar + Herb + Basket | $20–40 | Overloading with heavy appliances |
| Bathroom | Towels + Jar + Basket + Plant | $15–35 | Leaving product bottles exposed |
FAQ
Q1. How much weight can a floating shelf safely hold? It depends entirely on how the shelf is anchored. Brackets into drywall only: 5-10 lbs maximum. Brackets into wall studs: 40-60 lbs per bracket. For anything holding books, dishes, or kitchen appliances, always anchor into studs and use brackets rated for your intended load. Check the bracket’s stated weight capacity and stay within 70% of it.
Q2. What is the rule of three when styling floating shelves? Group objects in threes — one tall anchor item, one medium textural item, one small accent detail. Odd numbers create more visually interesting arrangements than even numbers because they resist the eye’s tendency to pair things symmetrically. Within each grouping, vary the heights, materials, and visual weights.
Q3. How do I keep floating shelves from looking cluttered? The 20/80 rule: display 20%, hide 80% in matching baskets and boxes. Leave 30% of the shelf surface empty. Use the 3-Layer Formula (large anchor, medium texture, small accent) for each shelf section. The most common cause of cluttered-looking shelves is too many items at similar sizes and heights competing for attention.
Q4. Can I install floating shelves without drilling holes? Command shelves (adhesive mounting) work for loads under 5-7 lbs — small plants, very lightweight decorative items. For anything heavier, drilling is necessary. In rental situations, the realistic options are getting permission to drill (with patch repair on move-out) or using freestanding furniture that achieves a similar aesthetic without wall attachment.
Q5. What type of wall is best for heavy floating shelves? Stud walls (wood frame behind drywall) are ideal — find the studs and anchor brackets directly into them. Concrete and brick walls also hold extremely well with the right masonry anchors. Standard drywall without stud anchoring is the weakest option and should only hold very light loads.
Q6. Why do some floating shelves start sagging over time? Usually one of three reasons: the bracket wasn’t anchored into a stud (drywall anchors gradually pull out under sustained weight), the bracket wasn’t rated for the actual load, or the shelf board is too thin and deflecting in the middle. Check bracket tightness periodically, stay within rated load capacity, and use 1.5-inch boards for shelves carrying meaningful weight.
Q7. What’s the best way to style floating shelves in a small apartment? Prioritize function over decoration. Every shelf section should have one container to hide clutter, one living thing (plant), and maximum five visible objects. In a kitchen, that means baskets for ugly items and open display for attractive ones. In a bathroom, matching apothecary jars replace product bottles. In a living room, limit objects and leave deliberate empty space.
Q8. How often should I dust and reorganize floating shelves? Dust every one to two weeks (30 seconds per shelf if it’s not overcrowded). Restyle lightly two to four times per year — not a full redesign, just small adjustments. Seasonal swaps, a new plant, a repositioned object. This maintains the freshness that makes open shelving appealing and prevents the visual habit of no longer seeing the shelf.
📚 Vomoxs Notes: How This Guide Was Built
Beautiful storage isn’t just about buying more organizers.
It’s about creating systems that are easy to maintain, fit your daily routine, and work in real homes—not just in styled photos.
To create this guide, our editorial team reviewed:
🏡 Real Home Organization Challenges
Insights from homeowners, renters, and small-space families about the storage problems they face every day.
🛠 DIY Installation & Safety
Best practices for mounting floating shelves, choosing the right hardware, and avoiding common installation mistakes.
🧺 Small-Space Organization Strategies
Practical storage methods focused on maximizing vertical space while reducing visual clutter.
💬 Community Experience
Real questions, frustrations, and solutions shared by DIY communities helped shape many of the practical tips throughout this guide.
Because the best storage system isn’t the one that looks perfect on day one.
It’s the one that’s still organized six months later.
Final Thoughts
Good organization isn’t about owning more storage products—it’s about creating systems that work with your daily life.
Whether you’re adding one floating shelf or reorganizing an entire room, focus on solutions that are practical, easy to maintain, and designed for the way you actually live. When storage works effortlessly, staying organized becomes a habit instead of a chore.
At Vomoxs, we believe the best storage ideas aren’t the most expensive — they’re the ones you can actually maintain. That’s why every guide we publish focuses on practical layouts, budget-friendly solutions, and everyday habits that make organizing easier long after the project is finished.
Explore more on Vomoxs:
- Small Space Storage Ideas: How to Organize a Small Apartment Room by Room
- Spice Rack Ideas: How to Organize Spices, Pots and Kitchen Counters
- Bathroom Organization Ideas: How to Organize Every Inch of Your Bathroom
Because the best-organized homes aren’t the most perfect—they’re the ones that make everyday life feel a little easier.
Category: Small Space Storage | Reading time: 12 min | Last updated: 2026