
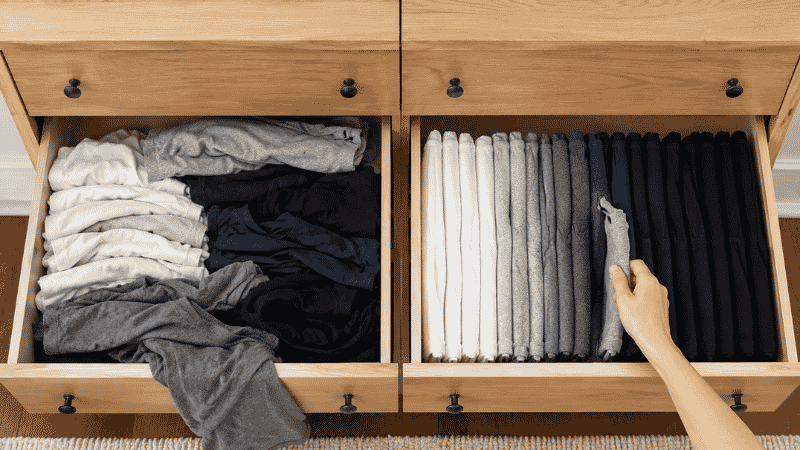
Picture this: you’ve just done laundry, everything is clean and warm from the dryer, and you open the drawer to put it away. You fold a shirt, place it on top of the pile, close the drawer. Three days later, someone pulls a shirt from the middle of the pile. The whole stack collapses. The drawer looks exactly like it did before you folded anything.
This is why most people feel like laundry is never actually done — not because of the washing and drying, but because the putting-away system doesn’t hold up past the first use.
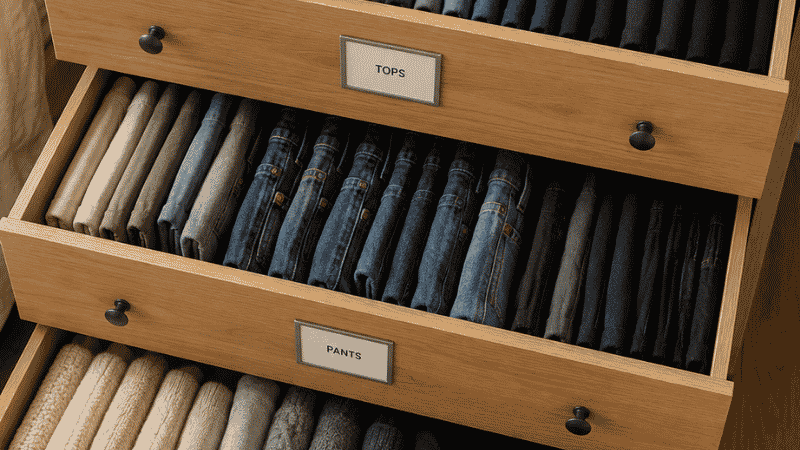
The problem almost always comes down to one thing: stacking clothes flat on top of each other. It looks organized in the moment, but the moment someone needs the shirt at the bottom, the entire system collapses. The fix is vertical storage — folding each item into a compact, self-standing rectangle and filing them upright in the drawer like books on a shelf. Every item is visible at once, every item is individually accessible, and pulling one out doesn’t disturb anything around it.
This guide covers how to fold shirts, pants, jeans, sweaters, and hoodies using the vertical method — with specific instructions for each clothing type, because the fold that works for a t-shirt doesn’t work for a pair of jeans.
Key Takeaways
- Filing clothes vertically (standing upright in rows) rather than stacking them flat can increase drawer capacity by up to 50% and makes every item visible at a glance.
- The “file folding” method — popularized by Marie Kondo but used by professional organizers long before — works for nearly every clothing type except delicate knits and formal wear.
- The goal of any fold is a rectangle compact enough to stand upright on its own. If it falls over in the drawer, the fold needs adjustment.
- Different fabrics and clothing types require different folding approaches — the same fold that works for a cotton t-shirt will damage a cashmere sweater.
- A folding board ($8–$15) creates perfectly uniform folds every time and makes the process significantly faster, especially for households with high laundry volume.
Why Vertical Folding Changes Everything
Before getting into the specific folds, it’s worth understanding why the method matters — because once you understand the principle, all the specific techniques make intuitive sense.
Traditional flat stacking has one fatal flaw: you can only access the top item without disrupting everything below it. This means the clothes at the bottom of the stack are effectively invisible — you forget you have them, you wear the same top few things repeatedly, and every time someone needs something from the middle, the whole pile needs to be rebuilt.
Vertical filing solves this completely. When clothes stand upright in rows — like files in a filing cabinet — every item is:
- Visible at a glance (no digging)
- Individually accessible (pull one without touching others)
- Self-contained (one item’s movement doesn’t affect the rest)
Professional organizers who’ve been doing this for years consistently report the same thing: clients who switch to vertical folding find themselves wearing more of their wardrobe because they can see everything they own. Items that were invisible at the bottom of a stack suddenly become part of the daily rotation again.
The one adjustment it requires: each item needs to be folded to a height that fits your drawer’s depth. Measure your drawer before you start, fold one item to that height, and use it as a reference for everything else.
How to Fold Shirts: The File Fold Method
This works for t-shirts, casual button-downs, polos, and most lightweight tops.
Step-by-step:
Lay the shirt face down on a flat surface. Smooth out any major wrinkles with your hands — you’re not ironing, just removing the lumps that make folding uneven.
Fold the right side of the shirt inward to the center, bringing the right edge to the middle of the shirt. Fold the sleeve back so it lies flat within the shirt’s outline — you don’t want the sleeve poking out the side.
Repeat on the left side. You now have a long, narrow rectangle approximately one-third the width of the original shirt.
Fold the bottom third up toward the collar. Then fold the resulting rectangle in half from bottom to top. You should now have a compact rectangle that stands upright on its own when you set it on its folded edge.
The test: Set the folded shirt on its short edge (the folded bottom). If it stands without falling over, the fold is right. If it collapses, the fold is either too loose or the proportions are off — try making it slightly narrower.
How to Fold T-Shirts Specifically
T-shirts follow the same method but tend to be shorter than regular shirts, which means the final fold is more compact. For very short t-shirts (crop tops, children’s shirts), fold into thirds vertically first, then fold the bottom up only once rather than twice — the goal is always a rectangle that fits the drawer height.
The collar question: Fold t-shirts face-down so the collar and any graphic print are facing down. When you look into the drawer, you see the folded bottom edge of each shirt — uniform and clean. When you reach in, the graphic faces up as you lift it out.
How to Fold Pants and Jeans
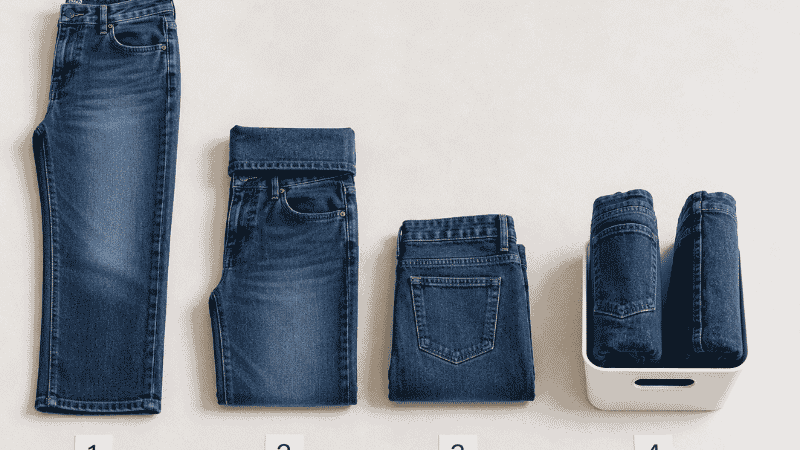
Pants and jeans are where most people’s folding systems break down — they’re bulky, the legs are long, and the waistband creates an uneven thickness that makes a neat fold difficult.
Step-by-step for pants and jeans:
Lay the pants flat with the front facing up. Fold one leg directly on top of the other so the pants form a single-layer rectangle. Line up the seams as closely as you can — this is what prevents the fold from looking lumpy.
Fold the waistband end down approximately 3 inches to create a cuff. This step is optional but helps with thicker fabrics (denim especially) by creating a more even thickness throughout the fold.
Fold the bottom third of the pants up toward the waist. Then fold the whole piece in half, bringing the folded bottom up to meet the waist.
For jeans specifically: Denim is thick. Your final fold will be thicker than a folded shirt, which means you’ll fit fewer pairs per row. That’s fine — the goal is visibility and accessibility, not maximizing quantity. Three or four pairs of visible jeans beats ten pairs in an inaccessible stack.
For dress pants and trousers: Follow the same method but skip the waistband cuff, and take more care with the leg crease. Dress pants with a sharp crease should be stored with the crease aligned, not folded against it.
How to Fold Sweaters
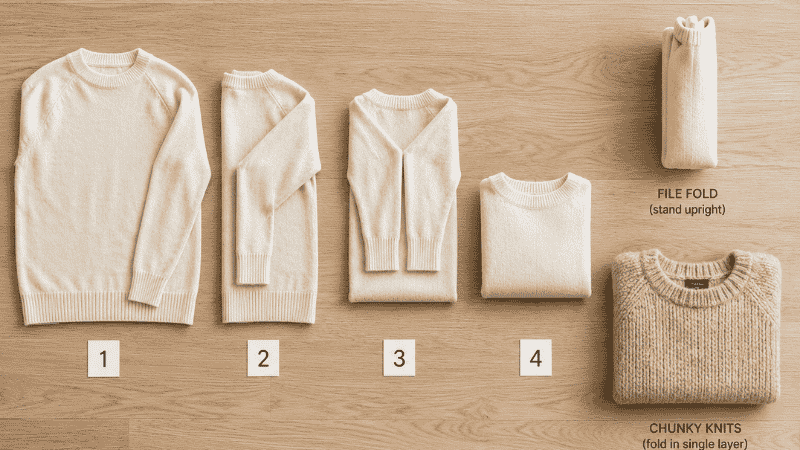
This is where most people make the mistake that damages their clothes. Sweaters — especially wool, cashmere, and chunky knits — should almost never be hung (the weight causes them to stretch and lose their shape). They should be folded, but the standard flat fold can cause permanent creases in delicate fabrics.
The right way to fold sweaters:
Lay the sweater face down on a flat surface. Fold one sleeve straight across the back of the sweater, so the sleeve runs horizontally across the torso. Then fold that sleeve down at the elbow so the cuff sits near the hem — you’re creating a compact sleeve that lies flat within the sweater’s outline.
Repeat with the other sleeve. You now have a rectangle with no protruding sleeves.
Fold the bottom third of the sweater up toward the collar. Fold the top third down to meet it. You now have a neat thirds-fold that you can file vertically.
For chunky knits and heavy wool: The file-folding method puts creases in heavy knits that can be hard to release. For very bulky sweaters, a simple thirds-fold (without the vertical filing) stored in a single layer on a shelf is often better than forcing them into a drawer vertical system that creates pressure points.
The cashmere exception: Cashmere and other luxury knits benefit from being stored without any tight folds that could weaken the fibers. Fold loosely, store in a breathable bin or on an open shelf, and add cedar blocks to protect from moths. The tight filing system that works for cotton is too aggressive for cashmere long-term.
How to Fold Hoodies
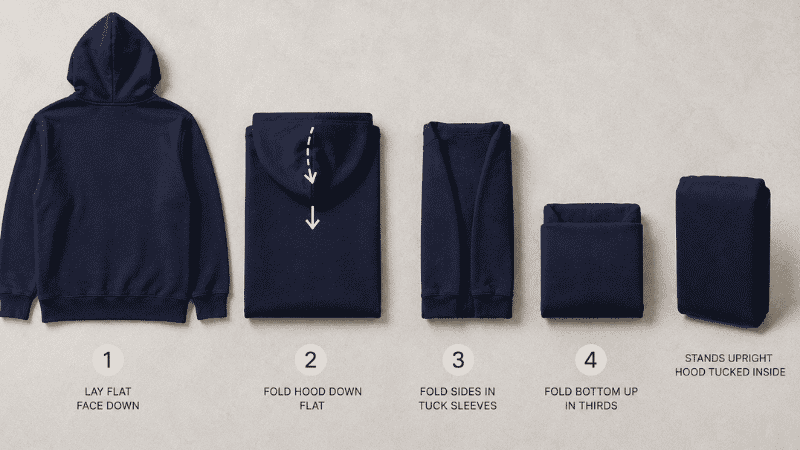
Hoodies present a specific challenge: the hood. Without addressing the hood, any fold you do will have an uneven bulge at the top that prevents a clean rectangle.
Step-by-step:
Lay the hoodie face down. Fold the hood back flat against the body of the hoodie — essentially tucking the hood down so it lies flat.
Fold the right side inward (including the sleeve) to the center. Fold the left side inward. You now have a narrow rectangle.
Fold the bottom third up, then fold the whole piece in half. The hood, now tucked inside the fold, creates a slightly thicker top — this is normal and doesn’t affect the function.
For zip-up hoodies: Zip or button before folding. An open zip creates uneven edges that make a neat fold nearly impossible.
Editor’s note: Hoodies are the item most people give up on and just shove into a drawer. The hood is genuinely tricky. But once you nail the hood-tuck step, the rest of the fold is actually easier than folding a regular shirt because hoodies hold their shape better due to the weight of the fabric.
The KonMari Folding Method: What It Is and When It’s Worth Using
Marie Kondo’s approach to folding is essentially the vertical file fold method with a few specific additions — and it’s worth understanding because it popularized the system for millions of people and introduced some genuinely useful principles.
The core KonMari principle is that each folded item should be able to stand upright on its own. If it can’t stand, it needs to be refolded until it can. This self-standing test is actually the most useful thing Kondo contributed to folding technique — it’s an objective quality check that removes the guesswork.
The other KonMari additions: fold with care and intention (which is less mystical than it sounds — it just means taking the extra 10 seconds to smooth and align rather than rushing), and store items so they’re visible in a single glance when you open the drawer.
Where KonMari folding is most useful:
- T-shirts and casual tops
- Jeans and casual pants
- Lightweight knitwear
- Socks and underwear (the roll method for socks)
Where it’s less useful:
- Formal wear (too much folding risk for delicate fabrics)
- Heavy wool and chunky knits (too much pressure at fold points)
- Items you’ll rewear before washing (they don’t need to be perfectly filed if they’re coming out again in 24 hours)
How to Fold Clothes to Save Space in Small Drawers
Small drawers — the kind in apartment dressers or kids’ furniture — require adjusted folding that accounts for shallower depth.
The proportional fold: Before folding anything, measure your drawer’s depth (front to back). This is the maximum height your folded item can be when standing upright. A drawer that’s 10 inches deep needs items folded to a height of roughly 8–9 inches, leaving a little room. Fold one item to this height and use it as a template for everything else in that drawer.
Fewer categories per drawer: In a small dresser, mixing too many clothing types in one drawer creates visual chaos that makes the vertical system harder to maintain. Assign each drawer a single category — all t-shirts in one drawer, all pants in another — rather than mixing.
Drawer dividers as vertical supports: Tall stacks of vertically filed clothes can lean and topple without something to lean against. Drawer dividers create vertical walls that keep rows upright even when a row gets low. A simple expandable bamboo divider costs $10–$15 and holds everything in place.
Why Your Folding System Collapses (And How to Fix It)
If you’ve tried vertical folding before and it devolved back to chaos within two weeks, it was almost certainly one of these:
Other people in the household aren’t folding the same way. A vertical filing system collapses the moment someone stuffs an unfolded shirt into the drawer. The system only works when everyone using the drawer follows it — which means everyone needs to know the method, and the method needs to be simple enough that they’ll actually do it consistently.
The items aren’t folded to a consistent size. If some shirts are folded to 8 inches and others to 12 inches, the rows won’t stand evenly and the drawer becomes uneven quickly. Measure the drawer, pick a target height, and fold everything to match.
The drawer is overfull. A filing system needs some breathing room. If the drawer is packed so tightly that pulling one item out requires force, the system will fail within days. Remove 20% of the drawer’s contents — put them in rotation storage or donate them — and the system will hold significantly better.
If You Only Have 10 Minutes Right Now
10 minutes: Apply the vertical fold to just one category — all t-shirts, or all jeans. Empty the drawer, fold each item using the method above, file them vertically. That one drawer will show you immediately how different the system feels to use.
20 minutes: Do two drawers, focusing on the ones you open most often. The daily-use items benefit most from immediate visual access.
30 minutes: Fold all clothing in one dresser. This is the minimum to see the full system effect — a single drawer converted doesn’t demonstrate the cascading organization that happens when all drawers work together.
FAQ: How to Fold Clothes
What is the best way to fold shirts to save drawer space? The vertical file fold — folding each shirt into a compact rectangle that stands upright on its edge — saves the most drawer space and keeps every shirt visible simultaneously. Fold the shirt in thirds horizontally, fold the bottom up in thirds, and file upright rather than stacking flat. The result is a drawer where you can see every shirt at once and pull any one out without disturbing the rest.
How do you fold jeans to save space? Lay flat, fold one leg onto the other, optionally fold the waistband down 3 inches to even out the thickness, then fold in thirds from bottom to waist. File vertically. Denim takes up more space than cotton shirts per item, so expect 3–4 pairs per row rather than 5–6. The priority is accessibility and visibility, not maximum quantity.
How do you fold sweaters without damaging them? Fold the sleeves in across the back, fold in thirds from bottom to collar, and store either vertically (for lighter knits) or horizontally in a single layer on a shelf (for heavy wool and chunky knits). Avoid hanging sweaters — the weight causes stretching at the shoulders. Never use tight vacuum bags for cashmere or luxury knits as the compression damages the fibers.
What is the KonMari folding method? The KonMari method is a vertical file-folding system where each item is folded into a compact rectangle that can stand upright on its own. The self-standing test — if the item falls over, refold it — is the practical core of the method. It works well for most casual clothing, socks, and lightweight knitwear, and is the same principle professional organizers have used for decades under different names.
How do I fold hoodies neatly? The key is addressing the hood first — fold it flat against the body of the hoodie before doing anything else. Then fold the sides inward, fold from the bottom in thirds, and file vertically. Zip or button the hoodie before folding. The result is bulkier than a folded t-shirt but follows the same upright-standing principle.
How many times should you fold a shirt? Most shirts fold neatly in three stages: fold in thirds horizontally (bringing both sides to the center), fold the bottom third up, fold in half again. The total is typically two or three folds, resulting in a rectangle roughly the size of a paperback book. The exact number depends on the shirt’s size and your drawer’s depth — the goal is a rectangle that stands upright at your drawer’s height.
Does the rolling method save more space than folding? Rolling (military roll or travel roll) saves slightly more space per item than folding in some cases, making it ideal for travel bags and packing suitcases. For drawers, the file-fold method is generally preferred because rolled items tend to unroll when you pull one out, while file-folded items hold their shape better when accessed repeatedly. For travel, roll; for drawers, file fold.
Start With One Drawer Tonight
You don’t need to convert your entire wardrobe to the vertical system in one session. Empty one drawer — just one — and refold everything in it using the method above. See how it feels to open that drawer tomorrow morning when every shirt is visible and individually accessible.
That one drawer will show you what the full system can feel like. The rest tends to follow naturally, drawer by drawer, once you’ve seen the difference.
Explore more on Vomoxs:
- How to Organize a Small Closet (Even If It’s Stuffed With Clothes)
- Bedroom Organization Ideas: How to Organize Your Bedroom for Good
- Seasonal Clothing Storage: How to Switch Out Your Wardrobe Without Losing Your Mind
References
- Kondo, M. (2014). The Life-Changing Magic of Tidying Up. Ten Speed Press. Vertical file-folding methodology and self-standing fold test.
- Roster, C. A., Ferrari, J. R., & Jurkat, M. P. (2016). The dark side of home: Assessing possession ‘clutter’ on subjective wellbeing. Journal of Environmental Psychology, 46, 32–41.
- American Cleaning Institute (2023). Laundry in America. Annual survey on laundry habits and storage practices.
Category: Room Organization | Reading time: 10 min | Last updated: 2026