You open a cabinet to grab a pot and spend the next 45 seconds moving things, stacking things, catching things that are falling, and finally retrieving what you came for — slightly irritated, slightly later than you wanted to be. You close the cabinet. You make a mental note to sort it out someday. Someday never comes, and next time you need the pot, it happens again.
Kitchen cabinet organization is one of those things that feels like it should be obvious but genuinely isn’t. Most of us just put things away where they fit when we first moved in, and the kitchen has been working against us ever since. The can opener is three cabinets from the stove. The pots are stacked in a tower that requires removing four of them to get to the one at the bottom. The spices are somewhere — you’re pretty sure — behind the coffee mugs.
The good news is that this isn’t a space problem in most kitchens. It’s a system problem. And systems, unlike square footage, can be fixed. This guide walks you through how to organize kitchen cabinets from scratch — whether you’re setting up a new kitchen for the first time or finally fixing the one that’s been frustrating you for years.
Key Takeaways
- The single biggest kitchen cabinet mistake is organizing by category rather than by proximity to use — storing things near where you actually use them reduces daily friction more than any organizer product.
- Most kitchen cabinets waste 40–60% of their vertical space. Shelf risers, stackable bins, and lid organizers can nearly double effective storage without adding new cabinets.
- The “zone system” — grouping items by the task they support, not by what they are — is the organizing principle used by professional organizers across hundreds of kitchen projects.
- Measuring your cabinet interior before buying any organizer is non-negotiable. A product that doesn’t fit is worse than no product at all.
- Your first cabinet layout will not be perfect. Planning for one adjustment session 2–4 weeks after the initial setup is part of the process, not a sign of failure.
Step 1: Empty Everything Out Before You Decide Anything

This step is non-negotiable and consistently the one people try to skip. You cannot organize a kitchen cabinet without first seeing everything that’s in it — not just the front row, but everything hiding behind, under, and stacked on top of itself at the back.
Pull everything out. All of it. Every cabinet, every drawer. Yes, the kitchen will look like a disaster for a couple of hours. That’s exactly what needs to happen.
While everything is out, do three things:
First, discard the obvious: expired pantry items (check every date — most people find items 1–3 years past expiry), broken tools, duplicate gadgets you don’t actually need multiples of, items for cooking styles you’ve tried once and abandoned. Professional organizer Jamin Mills puts it simply: “You can’t organize junk.” If it doesn’t earn a place in the kitchen, it doesn’t go back in.
Second, group by category on the counter so you can see total quantities. You might discover you own six wooden spoons. You need two. That discovery changes how much cabinet space the utensil category requires.
Third, wipe down the cabinet interiors. Empty cabinets are rare — clean them while you have the chance.
Editor’s note: This step takes longer than every guide tells you it will. Budget 45–60 minutes for a full kitchen empty-out, not 20. Make coffee first.
Step 2: Map Your Kitchen Zones Before Putting Anything Back
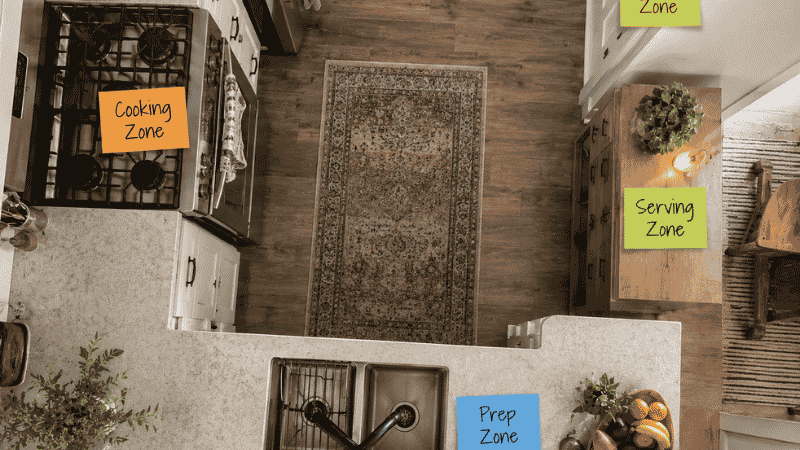
This is the step that separates a genuinely functional kitchen from one that just looks organized for the first two weeks. The principle is called zone organization, and it comes down to one rule: store things near where you use them, not near other things of the same type.
Think about how you actually move through your kitchen when you cook:
The cooking zone — the area around your stove and oven. This is where pots, pans, cooking utensils, oils, and spices belong. Everything you reach for while something is on the heat should be within one or two steps.
The prep zone — the area with your largest counter space, usually near the cutting board. This is where knives, cutting boards, mixing bowls, measuring cups, and food storage containers belong. These come out during prep, before cooking starts.
The serving zone — near your dining table or the counter where you plate food. This is where plates, bowls, serving dishes, and glasses belong. Ideally close to the dishwasher for easy unloading too.
The pantry zone — wherever your dry goods, canned goods, and packaged food live. If you have a dedicated pantry cabinet, this is it. If not, one or two cabinets designated for food storage.
The coffee and breakfast zone — near the coffee maker and toaster. Mugs, coffee, tea, small breakfast items.
Sketch this out roughly on paper before putting a single item back. Knowing which cabinet belongs to which zone tells you immediately where each item goes, without having to make individual decisions for every object.
Step 3: How to Organize Kitchen Cabinets by Type
Once you know which zone each cabinet serves, here’s how to actually organize what goes inside each one.
How to Organize Pots and Pans Cabinets
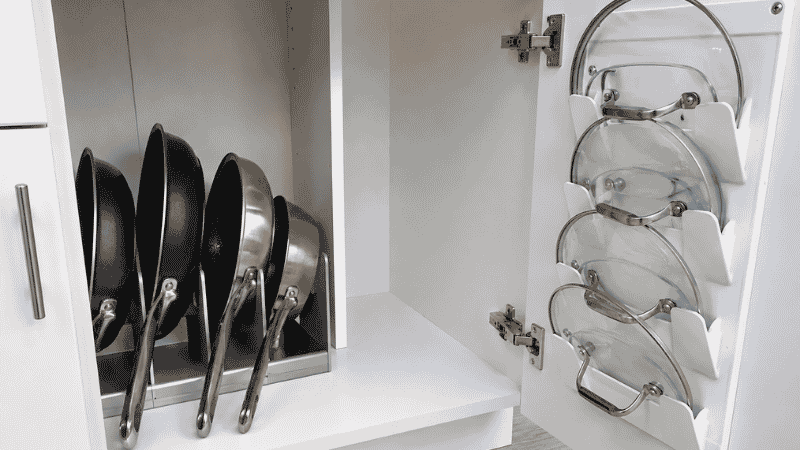
Pots and pans are the most physically awkward kitchen storage challenge — they’re heavy, oddly shaped, and the lids are always in the wrong place.
The stacking problem: Stacking pots and pans in a tower works until you need the one at the bottom, which is always the one you need. A pan organizer — a vertical rack that holds pans upright like files — solves this immediately. Each pan is individually accessible, no unstacking required.
The lid problem: Lids stored inside pots take up the space of two pots and fall out constantly. A dedicated lid organizer — either a rack that holds lids vertically inside a cabinet or a mounted organizer on the inside of a cabinet door — keeps lids separate, visible, and retrievable in one motion.
The size rule: Nest pans from largest to smallest only if they’re the same type (e.g., all skillets nested together). Mixing skillet sizes with saucepan sizes creates unstable stacks. Keep types together, sizes nested within types.
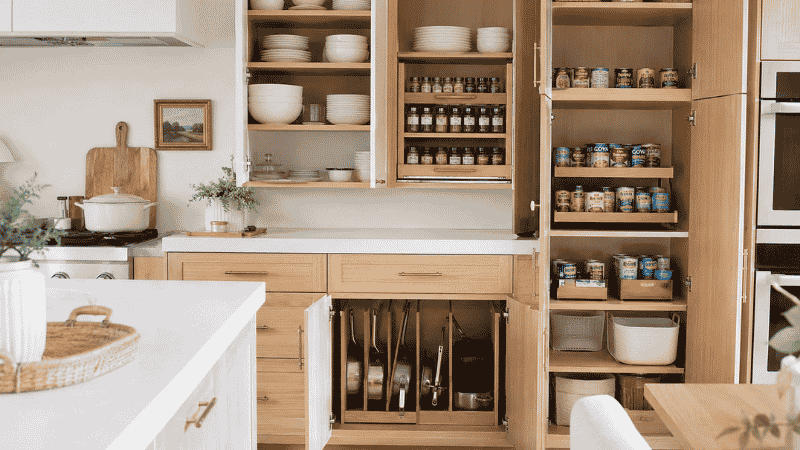
How to Organize Spice Cabinets
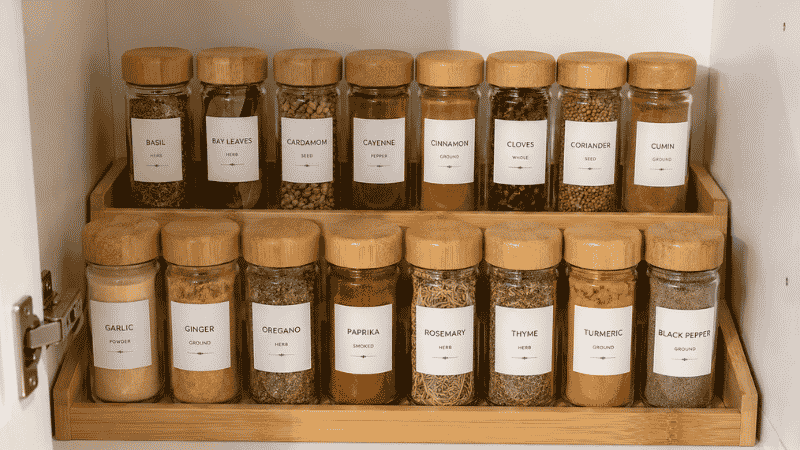
Spices are a particular kind of cabinet chaos — small, identically shaped, impossible to read when they’re not facing you, and always breeding duplicates when you can’t find the one you already have.
The tiered riser solution: A two-tier spice shelf riser inside a cabinet puts spices in two visible rows instead of one crowded row with a hidden back row. This is the single highest-impact upgrade for most spice situations, costs $10–$20, and requires no installation.
Alphabetical vs. category organization: Both work. Alphabetical is faster to navigate; category (baking spices together, savory spices together) makes more intuitive sense while cooking. Choose based on how your brain works, not what looks better in photos.
The duplicate problem: Spices accumulate duplicates faster than almost anything else in a kitchen. Before organizing, line up everything you have by spice name and consolidate. Combine two partial bottles of paprika into one. Discard any spice with no smell left — it’s not adding flavor anymore.
Location matters: Keep spices near the stove, not in a remote cabinet. Every extra step between the stove and the spice cabinet adds up across hundreds of cooking sessions.
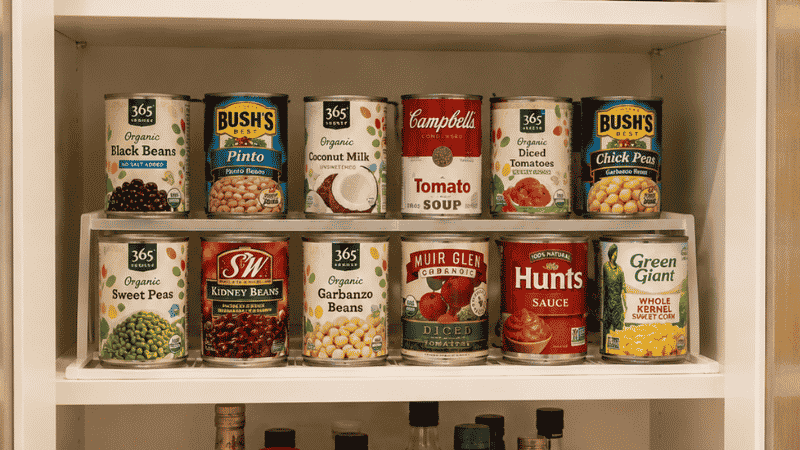
How to Organize Kitchen Cabinets for Food Storage
Pantry cabinets — whether a full pantry or just a couple of cabinets designated for food — are where most kitchen chaos originates. Things go in continuously (every grocery run) but only come out when you cook that specific thing, creating layers of accumulation.
The grocery store method: Place like items in single lines from front to back. The front row tells you what’s in that column; you have full depth of space without losing anything. Group by category: all canned goods together, all pasta together, all baking ingredients together.
Shelf risers for canned goods: A tiered shelf riser in a pantry cabinet means you can see every can simultaneously rather than having rows hidden behind rows. This single change eliminates the “I bought more because I couldn’t see what I had” problem that causes most pantry overstocking.
Turntables (lazy Susans) for bottles and jars: Oils, vinegars, sauces, and condiments in cabinet corners are notoriously hard to access. A turntable brings items from any angle to the front with a spin, and works equally well for spices, canned goods, and cleaning products under the sink.
Decanting dry goods — worth it or not? Decanting dry goods (pasta, rice, flour, sugar) into uniform labeled canisters looks beautiful and genuinely helps with inventory visibility. It also takes time and costs money. Honest assessment: if you cook with these items frequently, decanting is worth it — you can see quantities at a glance and the canister size limits how much you buy. If you cook irregularly, keeping items in original packaging is perfectly functional.
How to Organize Upper Kitchen Cabinets
Upper cabinets, especially those above the stove or fridge, are the hardest to access and therefore should hold the items you need least frequently.
Frequency hierarchy from bottom to top:
- Lowest cabinets (easiest access): Daily use items — everyday dishes, pots and pans, most-used tools
- Middle-height cabinets: Weekly use items — specialty cookware, serving dishes, less-used appliances
- Highest cabinets: Occasional or seasonal items — holiday serving pieces, specialty appliances used rarely, backup supplies
The most common mistake is putting everyday items in upper cabinets because that’s where there was space when you first moved in. This creates daily inefficiency that accumulates into genuine frustration over months and years.
For deep upper cabinets: Use the grocery store method — single lines front to back — and place the items you use most at the front of the line. A step stool near the kitchen (even stored in a cabinet or closet) makes high cabinet access actually usable rather than hazardous.
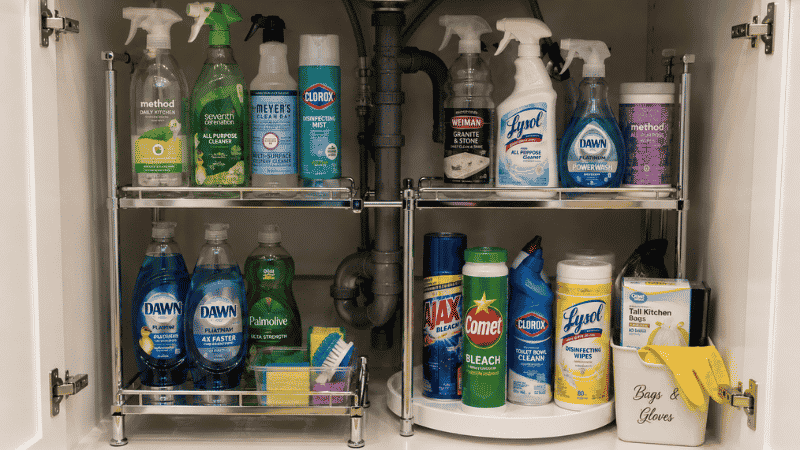
How to Organize Under-Sink Kitchen Cabinets
The cabinet under the kitchen sink is challenging because of the plumbing that takes up central space, the often-dark interior, and the tendency to become a cleaning product landfill.
The expandable shelf solution: An adjustable under-sink shelf organizer fits around the plumbing while adding a second level of storage above the pipes. This typically doubles the functional storage in an under-sink cabinet.
Cleaning products only: The under-sink cabinet should hold only cleaning and sink-adjacent items — dish soap backup, cleaning sprays, sponges, garbage bags. When other categories start migrating under the sink, the cabinet stops functioning.
Turntable for cleaning products: Cleaning product bottles are tall and tend to fall over. A turntable keeps them upright, accessible from any angle, and prevents the “cascade of bottles” every time you open the door.
How to Maximize Kitchen Cabinet Space Without Renovation
Even if your kitchen feels like it doesn’t have enough cabinets, there’s almost certainly unused capacity within the cabinets you have. These are the specific tools that unlock it.
Shelf risers: Add a second level to any flat shelf — for plates, glasses, spices, or pantry items. $10–$25, no installation, immediate impact.
Cabinet door organizers: The inside surface of cabinet doors is almost always empty. A slim door-mounted rack holds spices, foil, wrap and bags, pot lids, or cleaning products — invisible when closed, immediately accessible when open. Most use adhesive or hook over the door — no drilling for many versions.
Stackable bins and containers: Uniform stackable containers replace the unstable towers of random containers most cabinets accumulate into. Everything stays put when stacked properly, and you can see and access all levels.
Pull-out drawer inserts: For deep base cabinets, a pull-out drawer insert (sits inside the cabinet on the existing shelf, pulls forward) makes items at the back fully accessible without reaching or crouching. More expensive than other solutions but high-impact for the most-used base cabinets.
Vertical pan organizers: As mentioned in the pots section — holds pans and cutting boards vertically like files, each individually accessible without unstacking.
What to Do If You’re Organizing a New Kitchen From Scratch
Starting with an empty kitchen is genuinely harder than organizing an existing one, because you have no habit patterns to observe — no evidence of where you naturally reach, where you put things down, how you move when you cook.
The temporary placement strategy:
For the first two weeks in a new kitchen, don’t commit to anything. Put items in logical spots based on the zone system, but treat everything as provisional. Pay attention to what you’re constantly reaching across the kitchen to get, what keeps ending up somewhere other than its “home,” and which cabinets you open most and least.
After two weeks, you’ll have real behavioral data about how you use your specific kitchen. Do the full organization then — with evidence — rather than before you have any information.
The one-kitchen-at-a-time rule:
Even with an empty kitchen, organize one zone completely before moving to the next. Setting up the cooking zone (pots, pans, spices, cooking utensils) first means you can actually cook while the rest of the kitchen is still being figured out. You don’t have to get everything perfect before the kitchen is functional.
When Your Kitchen Cabinet Organization Stops Working
If you organized your kitchen cabinets and they’re already reverting to chaos within a few weeks, the system has a flaw — not your habits. Here’s what usually goes wrong:
The zone wasn’t actually right. You put the coffee mugs where they “made sense” logically, but you actually reach for them near the dining table, not near the coffee maker. If an item keeps migrating to a different location, that location is probably where it actually belongs. Let it live there.
There’s still too much. Organization doesn’t add storage capacity — it uses existing capacity more efficiently. If there are genuinely more items than the kitchen can hold, more organization won’t solve it. A second round of decluttering is the answer, not more organizers.
There’s no home for incoming items. Every grocery run brings new items into the kitchen. If there’s no designated landing spot and no clear system for where new things go, they pile up on the counter or get stuffed wherever there’s space. A designated “inbound” area — even a small section of counter or one cabinet — for items that need to be put away prevents the gradual accumulation that collapses systems.
If You Only Have 10 Minutes Right Now
10 minutes: Pick the one cabinet that causes you the most daily frustration. Empty it completely onto the counter. Throw away anything expired or broken. Put back only what belongs there, in a rough zone grouping. That’s it — the cabinet is better and you’ve started.
20 minutes: Do the 10-minute version, then measure that cabinet’s interior. Write down the dimensions. Next time you’re near a store or shopping online, you have the measurements to buy the right organizer the first time instead of guessing.
30 minutes: Complete one full zone — the cooking zone. Consolidate everything related to cooking (spices, oils, pans, utensils) into the cabinets and drawers closest to your stove. Nothing else, nothing more. One zone properly done changes how cooking feels immediately.
FAQ: How to Organize Kitchen Cabinets
What is the best way to organize kitchen cabinets? Organize by proximity to use, not by category. Everything you use at the stove goes in the cabinet closest to the stove. Everything for food prep goes near the prep counter. This zone system reduces daily friction more than any other single organizational decision.
How do I organize kitchen cabinets when I have no space? First, declutter — most kitchens have 20–30% more items than they need. Then maximize what space you have with shelf risers (doubles vertical space), cabinet door organizers (free real estate on every door), and vertical pan organizers (makes deep cabinets individually accessible). These three tools alone typically recover significant capacity without adding new storage.
What should go in upper kitchen cabinets? Items you use least frequently. Upper cabinets are the hardest to access, so they should hold seasonal items, specialty pieces, and backup supplies. Daily-use items — everyday dishes, most-used pots — belong in lower, easier-access cabinets.
How do I organize deep kitchen cabinets? Use the grocery store method: single lines of items from front to back so the front row tells you what’s in each column. Add a turntable for bottles and jars, and consider a pull-out drawer insert for base cabinets where you need access to items at the back.
How do I keep kitchen cabinets organized long term? Two habits: a weekly 5-minute reset where misplaced items return to their zones, and a “one in, one out” rule for new kitchen items. The reset prevents gradual accumulation; the rule keeps overall volume stable. The system does the daily work — the habits just keep it honest.
How should I organize kitchen cabinets in a small kitchen? Small kitchens benefit most from maximizing vertical space (shelf risers, tall stackable containers), using cabinet doors as storage surfaces, and being strict about what earns cabinet space vs. what belongs elsewhere. A magnetic knife strip frees significant counter and drawer space. Wall-mounted paper towel holders, pot racks, and spice rails move items off counters and cabinets entirely.
Do I need to buy organizers to organize kitchen cabinets? Not necessarily for the first pass. The zone system and decluttering alone significantly improve most kitchen cabinets before a single organizer is purchased. Once you’ve done the initial sort and have lived with it for a couple of weeks, you’ll know exactly what organizers would actually help — rather than buying things that look good in theory and don’t fit your specific situation.
Start With the Cabinet That Bothers You Most
You don’t have to do the whole kitchen today. You don’t even have to do a whole zone today. Pick the one cabinet that makes you sigh every time you open it, and spend 20 minutes on just that one.
A kitchen that works well isn’t built in an afternoon — it’s built in small sessions, adjusted over time, and maintained with habits that take a few minutes a week. The goal isn’t perfection. It’s a kitchen where you can find what you need in 10 seconds and put things away in 5.
That kitchen is completely achievable, starting with one cabinet.
Explore more on Vomoxs:
- How to Organize Kitchen Drawers (and Actually Keep Them That Way)
- Small Space Storage Ideas: How to Organize a Small Apartment Room by Room
- How to Declutter Your Home: A Room-by-Room Guide
References
- Roster, C. A., Ferrari, J. R., & Jurkat, M. P. (2016). The dark side of home: Assessing possession ‘clutter’ on subjective wellbeing. Journal of Environmental Psychology, 46, 32–41.
- Saxbe, D. E., & Repetti, R. (2010). No Place Like Home: Home Tours Correlate With Daily Patterns of Mood and Cortisol. Personality and Social Psychology Bulletin, 36(1), 71–81.
- McMains, S., & Kastner, S. (2011). Interactions of Top-Down and Bottom-Up Mechanisms in Human Visual Cortex. Journal of Neuroscience, 31(2), 587–597. Research on visual clutter and cognitive attention.
Category: Room Organization | Reading time: 10 min | Last updated: 2026