
You go to the grocery store, pick up a can of chickpeas, get home, open the pantry — and find two cans of chickpeas already there, buried behind the pasta you forgot you bought last month. Somewhere in the back, behind everything you can actually see, there’s probably a jar of something that expired in 2024.
This is the pantry problem. Not chaos, exactly. Just a system — or lack of one — where things go in easily but never quite come back out in a useful way. Where the front row is perfectly organized and the back row is a mystery. Where you can spend five minutes looking for the cumin while dinner is on the stove.
The frustrating part is that pantry disorganization is genuinely expensive. A 2020 study from the Natural Resources Defense Council found that the average American household wastes approximately $1,500 worth of food per year — and a significant portion of that waste comes from food that was bought, forgotten at the back of a pantry or cabinet, and eventually expired. A well-organized pantry isn’t just tidier. It’s a meaningful reduction in your grocery bill.
This guide covers the pantry organization system that actually solves the problem — from the initial setup to the specific tools for deep cabinets, small pantries, and everything in between.
Key Takeaways
- The average household wastes approximately $1,500 in food annually, much of it from items lost at the back of unorganized pantries and cabinets (NRDC, 2020).
- The zone system — organizing by food category and meal type rather than just “putting like with like” — reduces cooking friction and prevents duplicate purchases more effectively than any container product.
- Measuring your pantry shelves before buying a single container is non-negotiable. An ill-fitting container is worse than no container.
- Deep pantry shelves waste 40–60% of their storage capacity when used with standard front-to-back stacking. Turntables, pull-out baskets, and the “grocery store method” recover that capacity without renovation.
- A pantry that’s 80% full is easier to maintain than one that’s 100% full. The margin is what makes the system resilient.
Step 1: Empty the Pantry Completely and Audit What’s Actually There

Before buying a single bin or rearranging anything, everything has to come out. All of it. Every shelf, every cabinet, every drawer if they’re part of your pantry system.
This sounds extreme. It’s the step that makes everything else work.
While everything is out, do three things:
Discard expired items immediately. Check every date. Most people find items 6–18 months past their date — and this isn’t a personal failing, it’s what happens when things get pushed to the back and forgotten. Toss without deliberation.
Consolidate duplicates. Two half-empty bags of the same pasta? Combine them. Three partially used bottles of the same sauce? Keep the fullest, recycle the others (or combine if same variety). The goal is one active container per item.
Group by category on the counter. Before anything goes back in, arrange everything by type: all canned goods together, all pasta and grains together, all snacks together, all baking supplies together. This gives you a realistic inventory of what you actually own — and often reveals that you have far more of certain categories than the pantry space can comfortably hold.
The moment most people discover: During the audit, most households find they own 2–3 times more of certain items than they realized, and zero of items they thought they had. That’s the pantry disorganization problem made visible. The audit is where the real system design starts.
How to Organize a Pantry: The Zone System
This is the framework that separates a pantry that gets organized once and reverts, from one that stays functional for months. The zone system organizes your pantry by how you cook and use food, not just by what things are.
Most pantry organization advice says “group like items together.” That’s a start, but it misses the more important question: when do you reach for this item? A truly functional pantry is organized around cooking occasions, not just food categories.
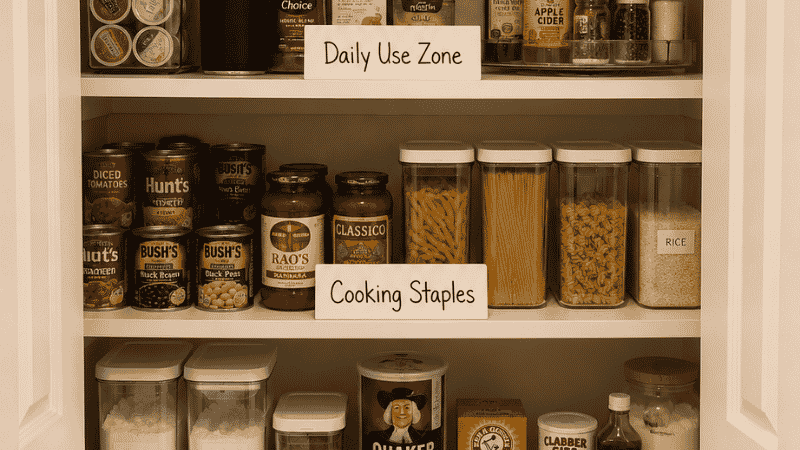
The five pantry zones:
Daily use zone (most accessible shelf, eye level) Items you reach for every day or almost every day: coffee, tea, cooking oils, the spices you use constantly, bread, snacks that are actively being eaten. These items should require zero searching and be retrievable in under 5 seconds.
Cooking staples zone (second most accessible) Items you reach for when cooking a meal: canned goods, pasta, rice, grains, stocks, sauces. Organized by cuisine type if you cook multiple cuisines regularly — all Italian staples together, all Asian pantry items together.
Baking zone (dedicated section, can be less accessible) Flour, sugar, baking powder, baking soda, chocolate chips, vanilla — everything you need when you’re baking. Because baking is a dedicated activity (not something you do mid-weeknight-dinner), this zone can live in a less accessible cabinet or the back section of a pantry.
Backup/bulk zone (least accessible — top shelf or back)** Extra stock of items you regularly use: the second bottle of olive oil, the backup pack of pasta, the extra canned tomatoes. When the active item is used up, the backup moves forward and the next grocery run replaces the backup.
Snack zone (accessible height for kids, if relevant) Designated section for snacks at a height the household can reach. Having a defined snack zone prevents kids from rummaging through the entire pantry and restores a specific area, rather than the whole thing.
Editor’s note: The backup zone is the single biggest game-changer for households that overbuy. When you can clearly see what backup stock you have, you stop buying more of things you already have two of — and you stop running out of things you thought you had. This one zone has a measurable impact on grocery spending.
Pantry Storage Ideas: The Tools That Actually Work
Once the zone system is mapped, storage tools make each zone functional. The principle: buy containers after you know your zones and have measured your shelves — not before.
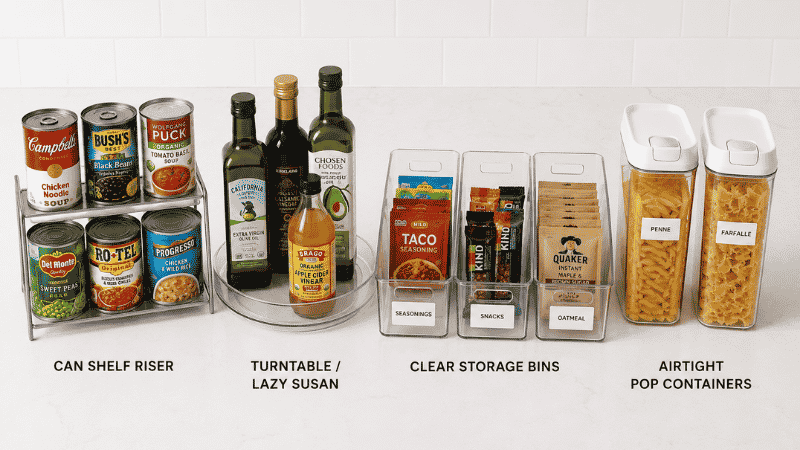
Shelf Risers for Canned Goods
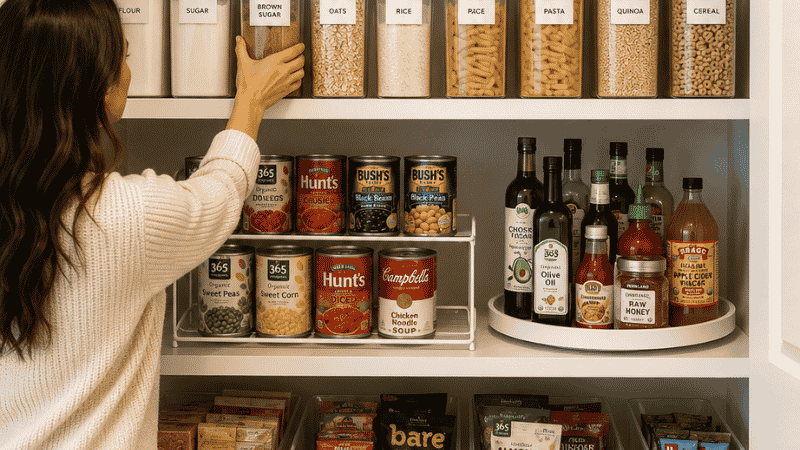
The most common deep pantry problem: rows of cans where the front row blocks everything behind it. A tiered can shelf riser creates two visible rows in the same shelf space, so every can is simultaneously visible. Label the front edge of each row by category and you’ll never buy duplicates of something you already have.
Cost: $15–$30. Impact: immediately solves the “hidden back row” problem for any shelf.
Turntables (Lazy Susans) for Bottles and Jars
Oils, vinegars, sauces, condiments, and jars are consistently the hardest items to access in a deep pantry — reaching to the back requires moving everything in front. A turntable brings any item to the front with a spin, makes the full contents of a cabinet visible in seconds, and keeps bottles from falling.
Use one turntable per category cluster: one for oils and vinegars, one for sauces and condiments, one for spices if they’re in a cabinet rather than a rack.
Clear Bins with Labels for Snack and Loose Items
Snacks, packets, small bags, and loose items that don’t stack or stand up on their own belong in bins. Clear bins let you see contents at a glance; labels tell everyone in the household what goes where, which is the only way to maintain a system when multiple people are using the pantry.
The key is buying bins in the right size for the category they’re meant to hold. Too large, and items slide around and mix. Too small, and overflow immediately breaks the system.
Pop-Top Containers for Dry Goods (When Worth It)
Decanting pasta, rice, flour, sugar, oats, and cereal into uniform airtight containers looks beautiful and genuinely serves a function: you can see exactly how much is left, items stay fresh longer, and containers stack vertically to use height rather than depth.
The honest trade-off: decanting takes time at every grocery run. It’s worth it for items you use frequently and buy in large quantities. It’s not worth it for specialty items you use occasionally — those can stay in their original packaging.
When decanting, measure first: The most expensive pantry organization mistake is buying a full set of matching containers and discovering your pasta doesn’t fit in the “pasta container.” Measure the volume of the most common package size of each item before choosing container sizes.
Small Pantry Organization Ideas: When You’re Working With a Cabinet, Not a Closet

Not everyone has a walk-in pantry or even a pantry closet. Many kitchens store all food in 1–3 standard cabinets — and the organization principles are the same but require more ruthless prioritization.
The small pantry priority rule: In a small pantry, only the items you use in the next 2 weeks earn cabinet space. Everything else — backup stock, bulk purchases, seasonal items — stores somewhere else (a basement shelf, a storage unit, a high garage cabinet).
Cabinet door storage: The inside surface of every pantry cabinet door is typically empty. A slim over-door or mounted-on-door rack holds spices, packets, wraps, foils, and small items — immediately doubling the effective storage of that cabinet without adding floor or shelf space.
Vertical thinking within each shelf: A shelf riser within a single cabinet shelf creates two levels. Combine with the tallest items at back, shortest at front, and you can fit significantly more into a standard cabinet than flat stacking allows.
One shelf, one category — without exception: In a small pantry, the temptation is to fill every empty inch regardless of category logic. This creates a pantry where nothing has a real home, things mix together, and the system collapses within weeks. One shelf, one category is the rule that keeps small pantry organization intact.
Deep Pantry Organization Ideas: How to Solve the Back-Row Problem
Deep shelves are one of the most common kitchen frustrations — the items at the front are accessible, and everything behind them might as well not exist. This is where most duplicate purchases happen, and where most food expires.
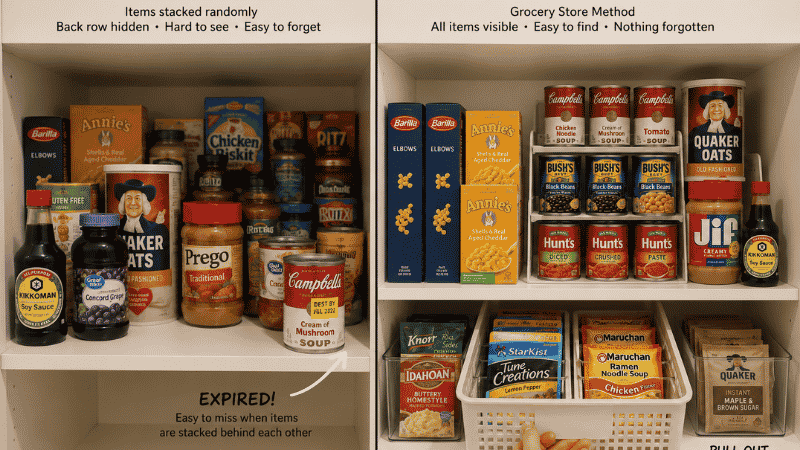
The Grocery Store Method for Deep Shelves
Professional pantry organizers consistently recommend the grocery store method for deep shelves: organize items in a single line from front to back, with all items in each column being the same product. The front item tells you what’s in the column; you work from the front and restock from the back.
This works for canned goods, boxed items, and bottles of the same product. It means you always know exactly what you have in each column, you always use oldest stock first (FIFO — first in, first out, the same rotation method grocery stores use), and you never discover expired items because nothing is hidden behind something else.
Pull-Out Baskets for Deep Base Cabinets
For deep base cabinets at floor level, where crouching and reaching is required to access the back, a pull-out basket or drawer insert transforms what’s typically a black hole into fully accessible storage. The basket slides forward on its own, bringing everything in it to the front.
No installation required for many pull-out organizers — they sit inside the cabinet on the existing shelf and slide on their own. A meaningful upgrade for any deep lower cabinet.
The Front-Loading Principle
For any shelf where a pull-out system isn’t practical: reserve the back of the shelf exclusively for backup stock of items at the front. The front row is the active item. The back row is one backup only. When the front is empty, the backup moves forward and the shopping list gets one item added.
This creates a self-managing inventory system — you always have a backup of what you use, you never accidentally have four backups of the same thing, and nothing gets lost at the back because the back has a defined purpose.
Pantry Organization Tips: What Makes Systems Last
Setting up a pantry takes an afternoon. Keeping it working for 6, 12, 18 months depends almost entirely on the maintenance habits built around it.
The one-in-one-out rule for pantry: When a new item comes home from the grocery store, it goes to the back of its column or into its bin. The existing item stays at the front. This is the grocery store rotation method applied at home — it takes zero extra time per grocery run and automatically prevents the accumulation of forgotten backstock.
The weekly 5-minute pantry scan: Once a week, before grocery shopping, spend 5 minutes scanning the pantry. What’s running low in the daily use zone? What backup stock has moved to the front and needs replenishing? What’s been in the same spot for three weeks and clearly isn’t getting used?
This 5-minute scan, done before the grocery trip, eliminates the two most expensive pantry problems: buying things you already have, and running out of things you thought you had.
The “doesn’t belong here” rule: Anything that isn’t food or directly food-adjacent (grocery bags, reusable bags, lunch boxes) that migrates into the pantry is taking up food storage space. Designate a different home for non-food items and return them there whenever they appear.
If You Only Have 10 Minutes Right Now
10 minutes: Pull everything from one single shelf. Check dates, discard expired items, combine duplicate partial packages. Put things back with the most-used items at the front, backups at the back. One shelf, properly done, takes 10 minutes and shows you immediately what the rest of the pantry can look like.
20 minutes: Do the full expired-item audit across the whole pantry without reorganizing anything else. Walk shelf by shelf, check every date, remove and discard everything past its date. This single step creates more space than almost any organizational product, and makes the actual reorganization session far more manageable.
45 minutes: Complete the full empty-audit-zone-plan sequence for your pantry. You won’t have time to buy and install new organizers in 45 minutes, but you’ll have a complete inventory, a zone plan drawn up, and a shopping list of exactly what organizers you need. The next session — buying and installing — becomes a 30-minute task rather than a full afternoon.
FAQ: Pantry Organization Ideas
How do I organize a pantry from scratch? Start with a full empty-out and expired-item audit. Then group everything by category on the counter so you can see what you actually own. Map your zone system (daily use, cooking staples, baking, backup, snacks) before anything goes back in. Measure your shelves. Then, and only then, buy any organizers you need. This sequence prevents the most common mistake: buying organizers that don’t fit the space or the food you actually own.
What are the best small pantry organization ideas? In a small pantry, prioritize what actually needs to be there: only items used in the next 2 weeks. Use cabinet door storage for spices and small items, shelf risers to create two levels within each shelf, and clear bins with labels for loose items. Apply the one-shelf-one-category rule strictly — mixing categories in a small pantry is what causes the system to collapse within weeks.
How do I organize deep pantry shelves? Use the grocery store method: single columns of the same product from front to back, working from front and restocking from back. Add a tiered can riser for canned goods so all cans are simultaneously visible. Use a turntable for bottles and jars so back-row items are accessible with a spin. For deep base cabinets, a pull-out basket organizer transforms inaccessible back-of-cabinet space into usable storage.
Should I decant my pantry items into matching containers? For items you use frequently and buy in large quantities (pasta, rice, flour, oats, cereal), yes — decanting into airtight containers improves visibility, keeps food fresh longer, and allows vertical stacking. For specialty or occasional items, no — keep original packaging. The key is measuring before buying containers; otherwise you buy containers that don’t fit what you’re trying to put in them.
How do I stop buying things I already have in the pantry? The grocery store rotation method (new items to the back, existing items stay front) combined with a weekly 5-minute pantry scan before grocery shopping eliminates this almost entirely. When you can see everything you have, and when you review it immediately before shopping, duplicate purchases stop happening. Opaque containers and cluttered back rows are the direct cause of most duplicate purchases.
How long does it take to organize a pantry? For an average pantry closet: 3–4 hours for the initial setup including the empty-out, audit, zone planning, and reorganization. If purchasing new organizers is part of the plan, add a separate shopping trip in between sessions. A single kitchen cabinet takes 30–45 minutes. The initial investment pays back immediately in reduced grocery waste and cooking friction.
How do I keep a pantry organized long term? Two habits: the one-in-one-out grocery rotation (new to back, existing stays front) and a weekly 5-minute pre-shopping scan. These two habits together take less than 10 minutes per week and prevent both the “forgot what I have” problem and the “ran out of something I thought I had” problem. Monthly, check the backup zone — anything that’s been backup stock for more than 4 weeks without being used needs to be reassessed.
Start With One Shelf Today
You don’t have to reorganize the entire pantry to feel the difference. Pull everything off one shelf — the most chaotic one, or the one you open most — check dates, combine duplicates, and put things back with a simple front-to-back zone logic.
That one shelf will show you what the whole pantry can feel like. And the grocery list you write before next week’s shopping will have fewer “wait, do I already have this?” questions on it.
Explore more on Vomoxs:
- How to Organize Kitchen Cabinets: A Step-by-Step Zone System
- How to Organize Kitchen Drawers (and Actually Keep Them That Way)
- How to Declutter Your Home: A Room-by-Room Guide
References
- Natural Resources Defense Council (2020). Wasted: How America Is Losing Up to 40 Percent of Its Food from Farm to Fork to Landfill. NRDC Issue Paper. Research on household food waste and economic cost.
- Roster, C. A., Ferrari, J. R., & Jurkat, M. P. (2016). The dark side of home: Assessing possession ‘clutter’ on subjective wellbeing. Journal of Environmental Psychology, 46, 32–41.
- Saxbe, D. E., & Repetti, R. (2010). No Place Like Home: Home Tours Correlate With Daily Patterns of Mood and Cortisol. Personality and Social Psychology Bulletin, 36(1), 71–81.
Category: Room Organization | Reading time: 10 min | Last updated: 2026